勇哥注:
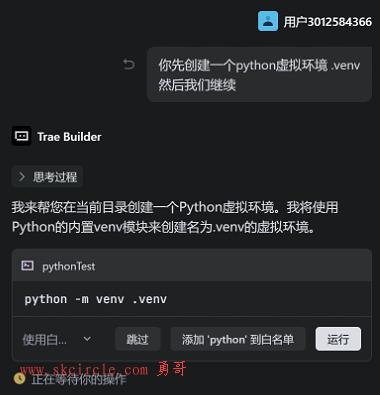
python的虚拟环境是常用的一种功能。因为我们写python程序时,可能要求的python版本和包的版本都各不相同。
有了虚拟环境,就可以每个程序隔离这种版本需求。
你可以想象一下,如果所有的版本的包都安装在主python环境下,将会有各种冲突。
勇哥注:
python的虚拟环境是常用的一种功能。因为我们写python程序时,可能要求的python版本和包的版本都各不相同。
有了虚拟环境,就可以每个程序隔离这种版本需求。
你可以想象一下,如果所有的版本的包都安装在主python环境下,将会有各种冲突。
勇哥注:
NX提升了多种应用程序开发包(API)对NX内部对象进行访问。
在这些API基础上,用户可以开发各种自动程序,定制NX功能,甚至可以在现有NX功能之上二次开发新的CAD/CAM/CAE软件产品。
勇哥注:
博图想配置nx mcd进行仿真,需要设置几个参数。如下:
(一)plc的属性 “允许来自远程对象的PUT/GET通信访问”
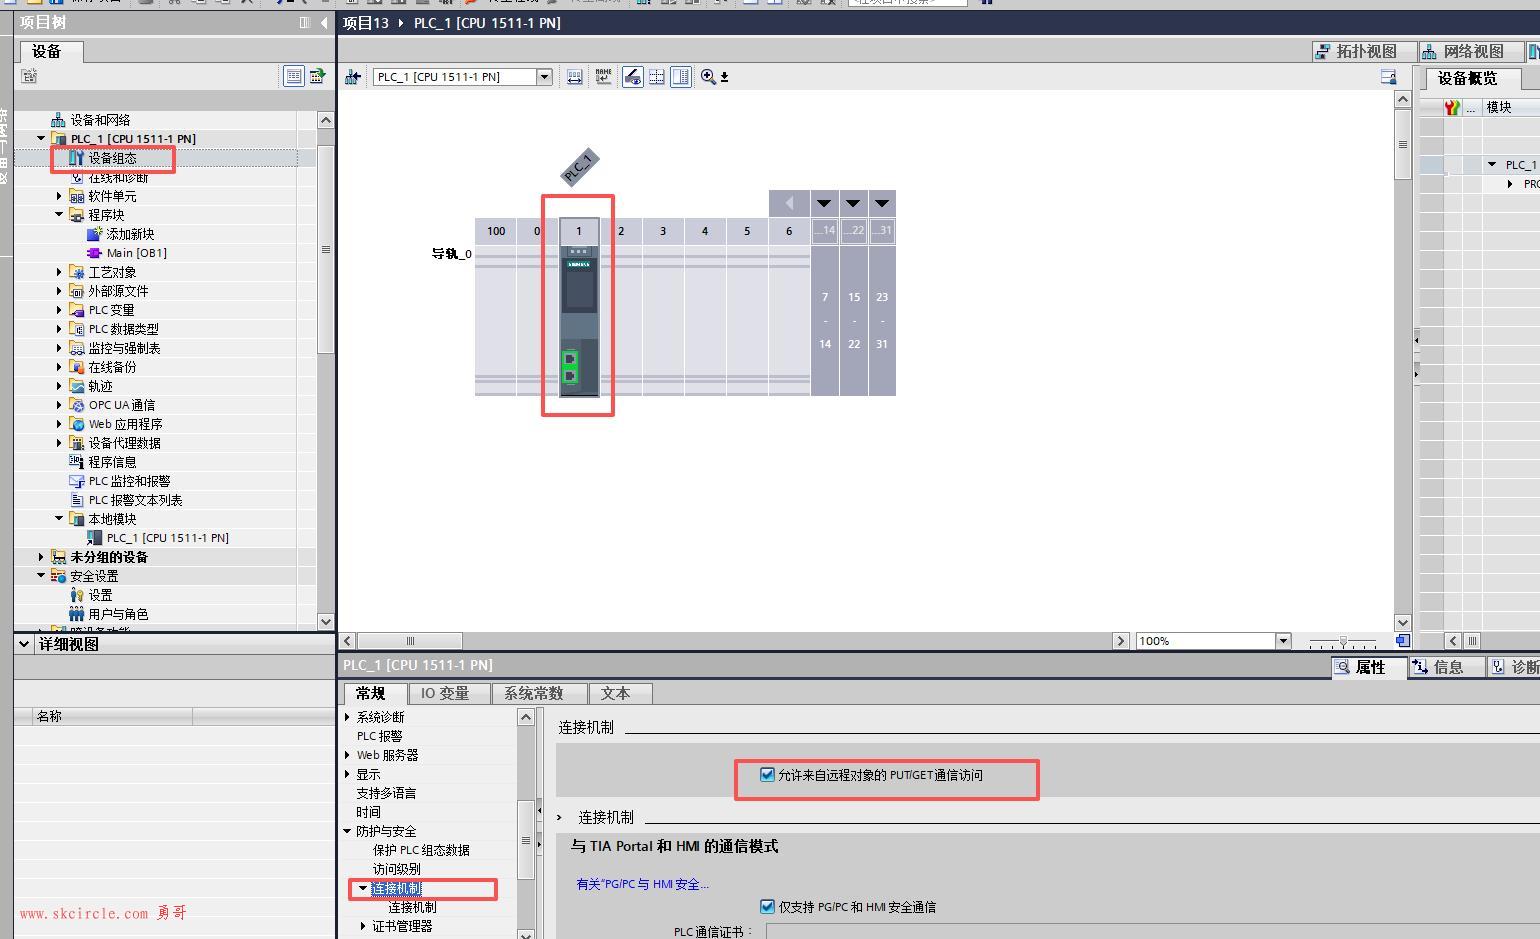
(二)在项目名字上右键,点击“属性”
勇哥注:
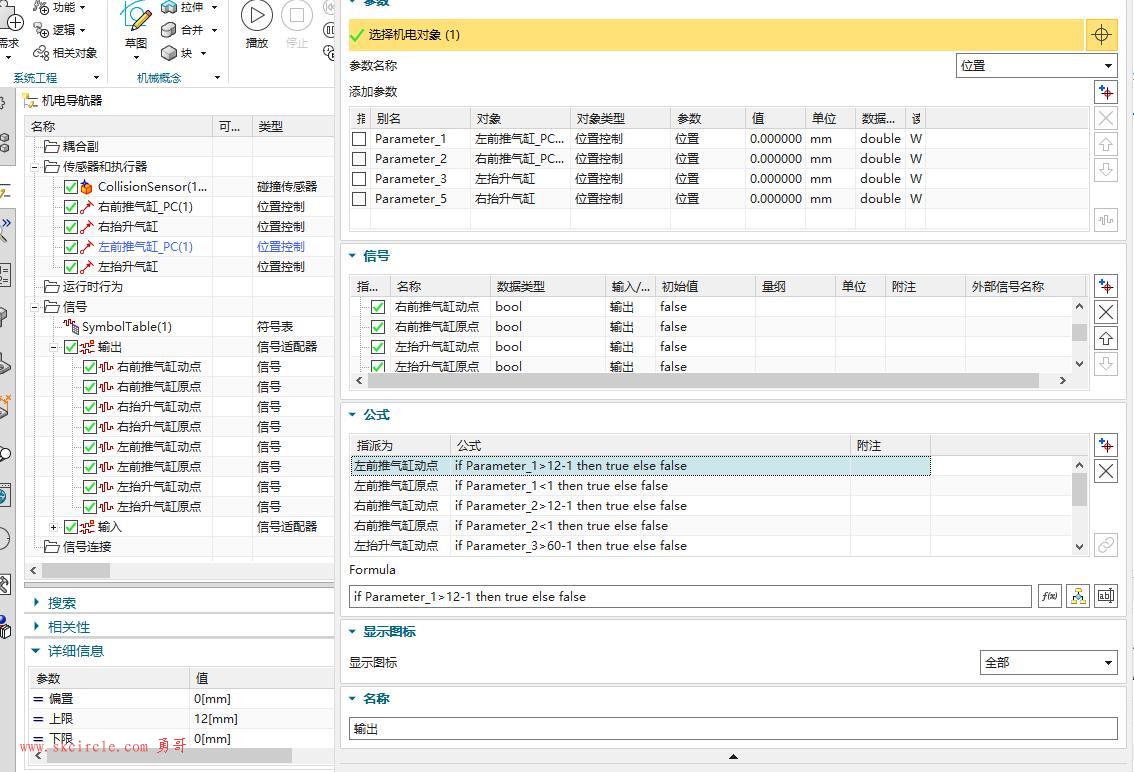
双控气缸、或者双控电磁阈(比如用来开关真空),之所以要双控,是为了避免意外断电断气时物料掉下来。
因此它们的out有两个,比如下面示例的上下气缸,它组合出来的4种可能性如下:
伸出 缩回
true false 动作:伸出
flase true 动作:缩回
勇哥注:
下面是对于大型项目做nx mcd仿真时的一些经验分享。读者如果对mcd非常了解,应该从本文本中读到一些共鸣的经验。欢迎大家补充。
输出信号:
动点,原点就是输出信号。
其它像轴的原点 、正负限位也是输出信号。
这里以“左前推气缸动点”来说明。
为啥我要写成 Parameter_1>12-1,而不写成Parameter_1>=12?
勇哥注:
设备中真空和破真空很常见,但是在mcd中我们并没有这样的mcd对象,下文中勇哥是使用固定幅来实现的。
真空还是有必要的,不然像下图中的料盘,在随着轴的载盘移动时,速度一快就会甩下去。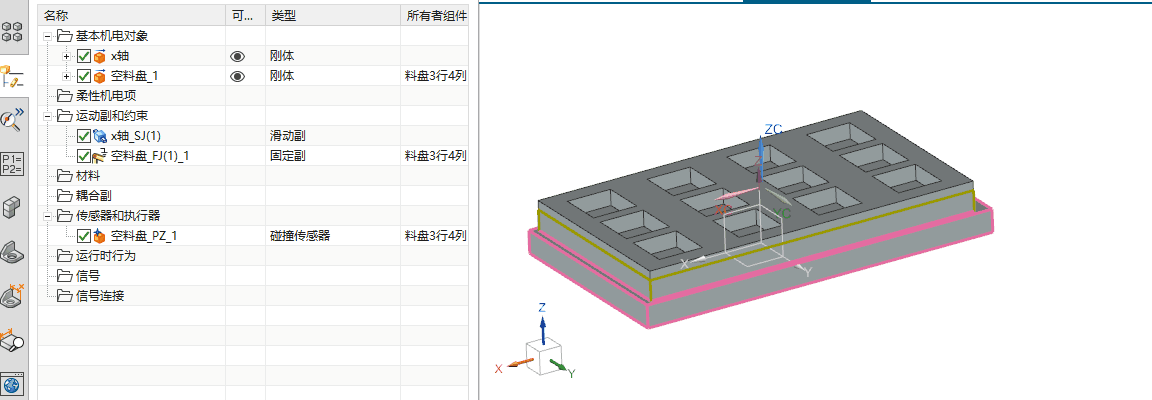
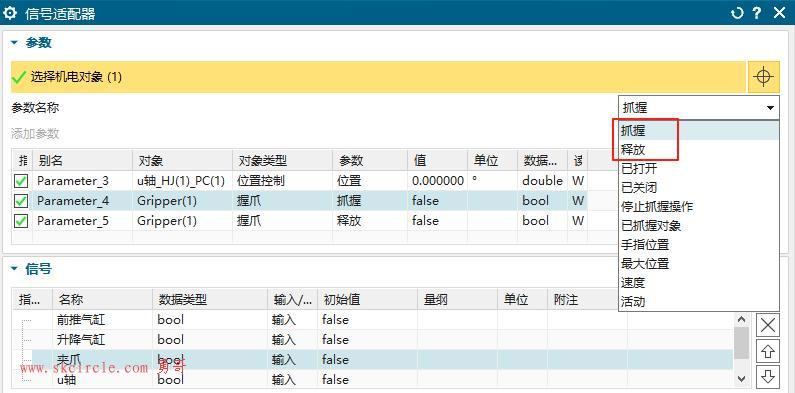
如果下图,这是“握爪”的定义。
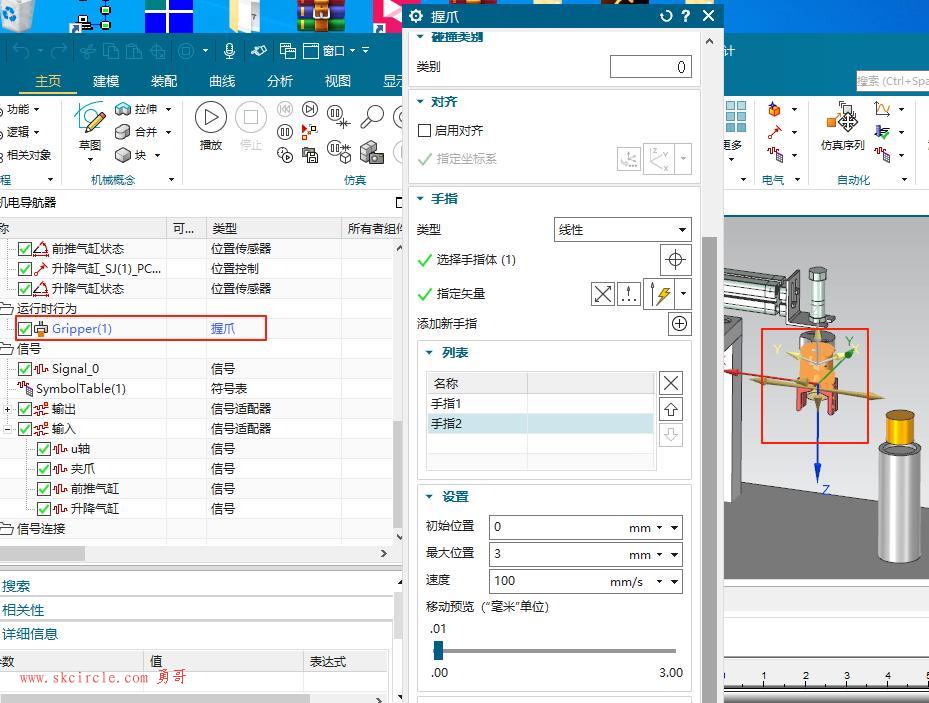
在信号适配器中,“握爪”有两个动作:抓握、释放
这个是自动录入modbus poll的程序。
import time
import unittest
import os
import sys
from appium import webdriver
# 导入文件工具类
from file_utils import file_utils
# 使用新的文件工具类替代旧的ConfigManager
class ConfigManager(object):
"""INI配置文件管理器(兼容旧接口)"""
def __init__(self, config_file='config.ini'):
"""初始化配置管理器"""
self.config_file = config_file
self.create_default_config_if_needed()
def create_default_config_if_needed(self):
"""如果需要则创建默认配置文件"""
if not os.path.exists(self.config_file):
template_data = {
'appium': {
'server_url': 'http://127.0.0.1:4723',
'implicit_wait': '10'
},
'modbus': {
'exe_path': r'D:\soft\software\Modbus\Modbus Poll\mbpoll.exe',
'timeout': '10'
},
'test': {
'delay_time': '2',
'screenshot_path': 'screenshots'
},
'element': {
'clear_button': '清除',
'one_button': '一',
'seven_button': '七',
'plus_button': '加',
'equals_button': '等于',
'calculator_results': 'CalculatorResults',
'从站地址': '127.0.0.1',
'从站端口': '1001',
'从站id': '1',
'数据类型': '01 Read Coils (0x)',
'数据地址': '600',
'数据数量': '100',
'显示一列': '20'
}
}
file_utils.create_ini_template(self.config_file, template_data)
print("已创建默认配置文件: %s" % self.config_file)
def get(self, section, option, fallback=None):
"""获取配置值"""
return file_utils.read_ini(self.config_file, section, option, fallback)
def getint(self, section, option, fallback=0):
"""获取整数配置值"""
return file_utils.read_ini_int(self.config_file, section, option, fallback)
def getboolean(self, section, option, fallback=False):
"""获取布尔配置值"""
return file_utils.read_ini_boolean(self.config_file, section, option, fallback)
# 创建全局配置管理器实例
config = ConfigManager()
class SimpleCalculatorTests(unittest.TestCase):
@classmethod
def setUpClass(self):
#set up appium
desired_caps = {}
# 从配置文件获取设置
app_path = config.get('modbus', 'exe_path', r"D:\soft\software\Modbus\Modbus Poll\mbpoll.exe")
server_url = config.get('appium', 'server_url', 'http://127.0.0.1:4723')
print("正在启动应用: %s" % app_path)
print("连接到Appium服务器: %s" % server_url)
desired_caps["app"] = app_path
self.driver = webdriver.Remote(
command_executor=server_url,
desired_capabilities=desired_caps)
@classmethod
def tearDownClass(self):
self.driver.quit()
def test_run_sequence(self):
"""按顺序执行test_AddConfigPar和test_ImportTxtConfig"""
print("\n? 开始顺序执行测试...")
try:
# 先执行test_AddConfigPar
print("\n=== 执行 test_AddConfigPar ===")
self.Debug_AddConfigPar()
print("✅ test_AddConfigPar 执行完成")
# 等待2秒确保配置生效
time.sleep(2)
# 再执行test_ImportTxtConfig
print("\n=== 执行 test_ImportTxtConfig ===")
self.Debug_ImportTxtConfig()
print("✅ test_ImportTxtConfig 执行完成")
print("\n? 所有测试顺序执行完成!")
except Exception as e:
print(f"❌ 顺序执行失败: {e}")
raise
def getresults(self):
displaytext = self.driver.find_element_by_accessibility_id("CalculatorResults").text
# displaytext = displaytext.strip("Display is " )
displaytext = displaytext.strip("显示为 ")
displaytext = displaytext.rstrip(' ')
displaytext = displaytext.lstrip(' ')
return displaytext
def switch_to_english_input(self):
"""切换输入法为英文半角模式 - 使用Selenium键盘事件"""
try:
from selenium.webdriver.common.action_chains import ActionChains
from selenium.webdriver.common.keys import Keys
actions = ActionChains(self.driver)
# 方法1: 使用Alt+Shift切换输入法(Windows标准快捷键)
print("? 尝试切换输入法...")
actions.key_down(Keys.ALT).send_keys(Keys.SHIFT).key_up(Keys.ALT).perform()
time.sleep(0.3)
# 方法2: 使用Ctrl+Space切换输入法(备用方案)
# actions.key_down(Keys.CONTROL).send_keys(Keys.SPACE).key_up(Keys.CONTROL).perform()
# time.sleep(0.2)
# 确保半角模式:模拟Shift+Space
actions.key_down(Keys.SHIFT).send_keys(Keys.SPACE).key_up(Keys.SHIFT).perform()
time.sleep(0.2)
print("✅ 已尝试切换为英文输入法")
except Exception as e:
print(f"❌ 输入法切换失败: {e}")
print("⚠️ 请手动确保输入法为英文半角模式")
print("? 提示:在Windows中按Alt+Shift可切换输入法")
def Debug_AddConfigPar(self):
#self.setUpClass()
# 从配置文件获取元素名称
delay_time = config.getint('test', 'delay_time', 1)
slave_addr = config.get('element', '从站地址', '127.0.0.1')
slave_port = config.get('element', '从站端口', '1001')
slave_id = config.get('element', '从站id', '1')
data_type = config.get('element', '数据类型', '01 Read Coils (0x)')
data_addr = config.get('element', '数据地址', '600')
data_count = config.get('element', '数据数量', '100')
display_count = config.get('element', '显示一列', '20')
print("执行从站-连接:")
print(f"延时时间为:{delay_time}")
txtStr =self.driver.find_element_by_name("Connection").text
print(txtStr)
self.driver.find_element_by_name("Connection").click()
self.driver.find_element_by_name("Connect...\tF3").click()
time.sleep(1)
# 使用AutomationId操作输入框
# 方法1: 直接使用accessibility_id (推荐)
try:
# 查找"Connection Setup"对话框
Connection_dialog = self.driver.find_element_by_name("Connection Setup")
# 确保输入法为英文半角模式
self.switch_to_english_input()
# 查找AutomationId为"1113"的组合框(从站地址)
slave_addr_combo = Connection_dialog.find_element_by_accessibility_id("1113")
# 清除现有内容
slave_addr_combo.clear()
slave_addr_combo.send_keys(slave_addr)
time.sleep(delay_time)
# 查找AutomationId为"1114"的输入框(从站端口)
slave_port_input = Connection_dialog.find_element_by_accessibility_id("1114")
slave_port_input.clear()
slave_port_input.send_keys(slave_port)
time.sleep(delay_time)
# 点击OK关闭对话框
ok_button = Connection_dialog.find_element_by_name("OK")
ok_button.click()
time.sleep(delay_time)
# 查找AutomationId为"1003"的输入框(从站ID)
# slave_id_input = self.driver.find_element_by_accessibility_id("1003")
# slave_id_input.clear()
# slave_id_input.send_keys(slave_id)
except Exception as e:
print(f"使用AutomationId失败: {e}")
# 等待操作完成
time.sleep(delay_time)
print("执行从站-读取设置")
txtStr =self.driver.find_element_by_name("Setup").text
print(txtStr)
txtStr =self.driver.find_element_by_name("Setup").click()
self.driver.find_element_by_name("Read/Write Definition... F8").click()
time.sleep(delay_time)
# 查找"Read/Write Definition"对话框
try:
# 方法1: 通过窗口标题查找对话框
read_write_dialog = self.driver.find_element_by_name("Read/Write Definition")
print("找到Read/Write Definition对话框")
except:
# 方法2: 通过窗口类型查找
read_write_dialog = self.driver.find_element_by_class_name("#32770")
print("通过类名找到对话框")
# 操作ComboBox控件
try:
# 方法1: 使用AutomationId直接定位ComboBox
combo_box = read_write_dialog.find_element_by_accessibility_id("1005")
# 方法1a: 使用Appium的ComboBox操作
combo_box.click() # 先点击展开
time.sleep(delay_time) # 增加等待时间确保下拉列表完全展开
# 查找并选择"01 Read Coils (0x)"选项 - 仅在Read/Write Definition对话框内
try:
print("? 在Read/Write Definition对话框内查找ComboBox下拉选项...")
# 等待下拉列表展开
time.sleep(0.5+delay_time)
# 优化后的简洁选择逻辑:展开下拉列表后使用键盘导航选择
try:
from selenium.webdriver.common.by import By
# 记录当前值
initial_value = combo_box.get_attribute("Value.Value")
print(f"当前ComboBox值: {initial_value}")
if initial_value and data_type in str(initial_value):
print("✅ 已选中目标选项")
target_found = True
else:
print("? 展开下拉列表并使用键盘导航选择...")
# 点击ComboBox展开下拉列表
combo_box.click()
time.sleep(0.8) # 等待下拉列表完全展开
# 方法1: 使用键盘导航选择(↑↓键遍历)
try:
# 先按Home键回到顶部
combo_box.send_keys("\ue011")
time.sleep(0.2)
# 记录起始值
start_value = combo_box.get_attribute("Value.Value")
current_value = start_value
attempts = 0
max_attempts = 20 # 最多遍历20个选项
print("? 开始遍历下拉选项...")
while attempts < max_attempts:
if current_value and data_type in str(current_value):
print(f"✅ 找到并选中目标选项: {current_value}")
target_found = True
break
# 按向下箭头键选择下一个选项
combo_box.send_keys("\ue015")
time.sleep(0.3) # 等待选项切换
# 获取新的当前值
new_value = combo_box.get_attribute("Value.Value")
# 如果回到起始值,说明已经遍历完整个列表
if new_value == start_value and attempts > 0:
print("⚠️ 已遍历完所有选项,未找到目标")
break
current_value = new_value
attempts += 1
if attempts % 5 == 0: # 每5次打印一次进度
print(f" 已检查 {attempts} 个选项,当前: {current_value}")
# 如果找到了目标选项,按回车确认
if target_found:
combo_box.send_keys("\ue007")
time.sleep(0.3)
# 最终验证
final_value = combo_box.get_attribute("Value.Value")
if final_value and data_type in str(final_value):
print(f"✅ 最终确认选择成功: {final_value}")
else:
print(f"⚠️ 选择确认后值不匹配: {final_value}")
except Exception as keyboard_error:
print(f"键盘导航失败: {keyboard_error}")
print("? 尝试直接输入选择...")
try:
# 清除并输入
combo_box.send_keys("\ue009\ue010") # Ctrl+A全选
time.sleep(0.1)
combo_box.send_keys("\ue008") # 退格清除
time.sleep(0.2)
combo_box.send_keys(data_type)
time.sleep(0.5)
combo_box.send_keys("\ue007") # 回车确认
time.sleep(0.5)
final_value = combo_box.get_attribute("Value.Value")
if final_value and data_type in str(final_value):
print(f"✅ 直接输入选择成功: {final_value}")
target_found = True
except Exception as input_error:
print(f"直接输入失败: {input_error}")
except Exception as e:
print(f"ComboBox选择操作失败: {e}")
except Exception as e:
print(f"❌ ComboBox选择失败: {e}")
# 方法5: 获取对话框内所有可见选项(最终备选)
try:
print("? 获取对话框内所有可见选项...")
# 获取对话框内所有可见的ListItem和ComboBox选项
all_options = read_write_dialog.find_elements_by_xpath(".//*[@ClassName='ListItem' or contains(@Name, 'Read')]")
for option in all_options:
try:
name = option.get_attribute("Name")
print(f" 对话框内选项: {name}")
if name and "01 Read Coils (0x)" in str(name):
option.click()
print("✅ 最终遍历选择成功")
break
except:
continue
except Exception as e5:
print(f"最终备选方法失败: {e5}")
except Exception as e:
print(f"ComboBox操作失败: {e}")
# 继续其他输入操作
# 确保输入法为英文半角模式
self.switch_to_english_input()
# 查找AutomationId为"1115"的组合框(从站ID)
slave_id_combo = read_write_dialog.find_element_by_accessibility_id("1115")
slave_id_combo.clear() # 先清除现有内容
slave_id_combo.send_keys(slave_id)
print(f"从站ID: {slave_id}")
time.sleep(delay_time)
# 查找AutomationId为"1004"的输入框(从站首地址)
slave_port_input = read_write_dialog.find_element_by_accessibility_id("1004")
slave_port_input.clear()
slave_port_input.send_keys(data_addr)
print(f"从站首地址: {data_addr}")
time.sleep(delay_time)
# 查找AutomationId为"1006"的输入框(从站地址数量)
slave_addr_input = read_write_dialog.find_element_by_accessibility_id("1006")
slave_addr_input.clear() # 先清除现有内容
slave_addr_input.send_keys(data_count)
print(f"从站地址数量: {data_count}")
time.sleep(delay_time)
# 查找AutomationId为"1137"的输入框(从站一行显示的数量)
# slave_port_input = read_write_dialog.find_element_by_name("20")
# print(f"从站一行显示的数量: {display_count}")
slave_port_input = read_write_dialog.find_element_by_name("Fit to Quantity")
slave_port_input.click()
time.sleep(delay_time)
# 点击OK关闭对话框
ok_button = read_write_dialog.find_element_by_name("OK")
ok_button.click()
# self.driver.find_element_by_name(one_btn).click()
# self.driver.find_element_by_name(plus_btn).click()
# self.driver.find_element_by_name(seven_btn).click()
# self.driver.find_element_by_name(equals_btn).click()
# result = self.getresults()
# print("测试结果: %s" % result)
# self.assertEqual(result, "8")
# 使用配置文件中的延时
time.sleep(delay_time)
def Debug_ImportTxtConfig(self):
"""自动化将数据写入Modbus Poll表格"""
print("? 开始执行表格数据写入...")
delay_time = config.getint('test', 'delay_time', 1)
print(f"延时时间为:{delay_time}")
try:
time.sleep(delay_time)
# 1. 找到表格控件 "Mbpoll1"
print("? 查找表格控件 Mbpoll1...")
table = self.driver.find_element_by_name("Mbpoll1")
print("✅ 找到表格控件")
time.sleep(delay_time)
# 2. 获取表格的位置和大小信息
table_location = table.location
table_size = table.size
print(f"? 表格位置: x={table_location['x']}, y={table_location['y']}")
print(f"? 表格大小: 宽={table_size['width']}, 高={table_size['height']}")
# 3. 从txt文件读取数据
try:
data_file_path = os.path.join(os.path.dirname(__file__), "modbus_data.txt")
if os.path.exists(data_file_path):
with open(data_file_path, 'r', encoding='utf-8') as f:
data_content = f.read().strip()
print(f"? 从文件读取数据: {len(data_content.split(chr(10)))} 行")
else:
# 使用默认数据
data_content = "气缸 1\n气缸 1\n吸嘴 2\n吸嘴 2\n气缸 3\n气缸 3\n吸嘴 4\n吸嘴 4\n气缸 5\n气缸 5"
print("⚠️ 未找到modbus_data.txt,使用默认数据")
except Exception as read_error:
print(f"⚠️ 读取文件失败: {read_error},使用默认数据")
data_content = "气缸 1\n气缸 1\n吸嘴 2\n吸嘴 2\n气缸 3"
# 4. 复制数据到剪贴板
print("? 复制数据到剪贴板...")
try:
import pyperclip
pyperclip.copy(data_content)
print("✅ 使用pyperclip复制到剪贴板")
except ImportError:
# 备用方案:使用系统剪贴板
print("⚠️ pyperclip未安装,使用备用剪贴板方法...")
import subprocess
# 使用Windows命令行复制到剪贴板
subprocess.run(['clip'], input=data_content.encode('utf-8'), check=True)
print("✅ 使用系统剪贴板复制成功")
# 5. 更智能的表格单元格定位
from selenium.webdriver.common.action_chains import ActionChains
actions = ActionChains(SimpleCalculatorTests.driver)
print(f"\n?️ 测试点击左上角单元格...")
actions.move_to_element_with_offset(table, 50, 100).click().perform()
time.sleep(delay_time)
# 6. 验证并执行粘贴操作
print("? 验证焦点并执行粘贴...")
from selenium.webdriver.common.keys import Keys
try:
# 尝试获取当前焦点元素
active_element = self.driver.switch_to.active_element
# 清除现有内容
active_element.send_keys(Keys.CONTROL + "a")
time.sleep(0.2)
active_element.send_keys(Keys.DELETE)
time.sleep(0.2)
# 粘贴所有数据
active_element.send_keys(Keys.CONTROL + "v")
time.sleep(delay_time)
print("✅ 数据整体粘贴完成")
except Exception as click_error:
print(f"❌ 第一次点击失败: {click_error}")
except Exception as e:
print(f"❌ 表格数据写入失败: {e}")
# 保存错误截图
self.driver.save_screenshot("table_write_error.png")
raise e
time.sleep(1)
print("执行从站-读取设置")
txtStr = self.driver.find_element_by_name("Setup").text
print(txtStr)
txtStr = self.driver.find_element_by_name("Setup").click()
self.driver.find_element_by_name("Read/Write Definition... F8").click()
time.sleep(1)
# 查找"Read/Write Definition"对话框
try:
# 方法1: 通过窗口标题查找对话框
read_write_dialog = self.driver.find_element_by_name("Read/Write Definition")
print("找到Read/Write Definition对话框")
except:
# 方法2: 通过窗口类型查找
read_write_dialog = self.driver.find_element_by_class_name("#32770")
print("通过类名找到对话框")
# 查找AutomationId为"1137"的输入框(从站一行显示的数量)
display_count = config.get('element', '显示一列', '20')
slave_port_input = read_write_dialog.find_element_by_name("20")
print(f"从站一行显示的数量: {display_count}")
# slave_port_input = read_write_dialog.find_element_by_name("Fit to Quantity")
slave_port_input.click()
time.sleep(delay_time)
# 点击OK关闭对话框
ok_button = read_write_dialog.find_element_by_name("OK")
ok_button.click()
if __name__ == '__main__':
suite = unittest.TestLoader().loadTestsFromTestCase(SimpleCalculatorTests)
unittest.TextTestRunner(verbosity=2).run(suite)勇哥注:
下面的自动化测试的python代码,使用winappDriver和selenium进行,运行后会打开计算器程序,然后进行自动点击。
如果你用的是pycharm写代码,可以很方便的选择包的版本。
如果用AI编程环境Trae.cn或者cursor的话,你得告诉它们:请在虚拟环境中安装下面说的版本。
Powered By Z-BlogPHP 1.7.3
Copyright www.skcircle.com Rights Reserved.