 少有人走的路
一般说法是gmm分类器可以用于缺陷检测,mlp不支持缺陷检测。
勇哥还是想试试mlp到底能不能用于缺陷检测。
于是有了下面的实验。
这个实验用到的图片,原来是gmm分类器的一个倒子用到的。
dev_close_window()
read_image (Image, 'plastic_mesh/plastic_mesh_01')
get_image_size (Image, Width, Height)
dev_open_window(0, 0, Width, Height, 'black', WindowHandle)
get_system ('example_dir', HalconExamples)
gen_rectangle1 (Rectangle, 10, 10, Height / 2 - 11, Width / 2 - 11)
* 创建多层感知器,5维特征向量维度,6层神经元的隐藏层,输出2类,softmax分类器(多项式分布),预处理设置为'principal_components',使用主成分分析,特征向量所在的组件数3,随机数初始化种子是42
create_class_mlp (5, 6, 2, 'softmax', 'principal_components', 3, 42, MLPHandle)
* The training is based on five images that contain no errors.
*生成空区域
gen_empty_region (EmptyRegion)
*把矩形区域放入空区域中
concat_obj (Rectangle, EmptyRegion, ObjectsConcat)
*抽取5张图片的特征
for J := 1 to 5 by 1
read_image (Image, 'plastic_mesh/plastic_mesh_' + J$'02')
*缩小图片,减少运行时间
zoom_image_factor (Image, ImageZoomed, 0.5, 0.5, 'constant')
dev_display (ImageZoomed)
disp_message (WindowHandle, 'Adding training samples...', 'window', 10, 10, 'black', 'true')
*抽取纹理特征,见网格缺陷检测(GMM)博客
gen_texture_image (ImageZoomed, ImageTexture)
*把特征和空区域添加到训练句柄中
add_samples_image_class_mlp (ImageTexture, ObjectsConcat, MLPHandle)
endfor
*设置拒绝采样策略'hyperbox_ring_around_each_class'
set_rejection_params_class_mlp (MLPHandle, 'sampling_strategy', 'hyperbox_ring_around_each_class')
*设置拒绝采样策略因子3
set_rejection_params_class_mlp (MLPHandle, 'rejection_sample_factor', .3)
*开始训练,MaxIterations优化算法的最大迭代次数200, WeightTolerance最优算法在两次迭代的不同权重的阈值是1,两次迭代的平均错误的差值阈值0.01,Error训练数据的平均错误, ErrorLog作为一个优化算法的迭代次数函数在训练数据上的平均错误
train_class_mlp (MLPHandle, 200, 1, 0.01, Error, ErrorLog)
for J := 1 to 14 by 1
read_image (Image, 'plastic_mesh/plastic_mesh_' + J$'02')
*缩小图片
zoom_image_factor (Image, ImageZoomed, 0.5, 0.5, 'constant')
*抽取特征图
gen_texture_image (ImageZoomed, ImageTexture)
*裁剪特征图得到需要分类的区域
reduce_domain (ImageTexture, Rectangle, ImageTextureReduced)
*分类
classify_image_class_mlp (ImageTextureReduced, ClassRegions, MLPHandle, 0.5)
*分成两类区域,正确区域和错误的区域
select_obj (ClassRegions, Correct, 1)
select_obj (ClassRegions, Errors, 2)
* 错误区域开运算和闭运算,去除细小的区域
opening_circle (Errors, ErrorsOpening, 4.5)
closing_circle (ErrorsOpening, ErrorsClosing, 10.5)
connection (ErrorsClosing, ErrorsConnected)
*筛选面积大于100的区域
select_shape (ErrorsConnected, FinalErrors, 'area', 'and', 100, 1000000)
count_obj (FinalErrors, NumErrors)
dev_set_color ('red')
dev_set_draw ('margin')
dev_set_line_width (5)
dev_display(ImageZoomed)
dev_display (FinalErrors)
if (NumErrors > 0)
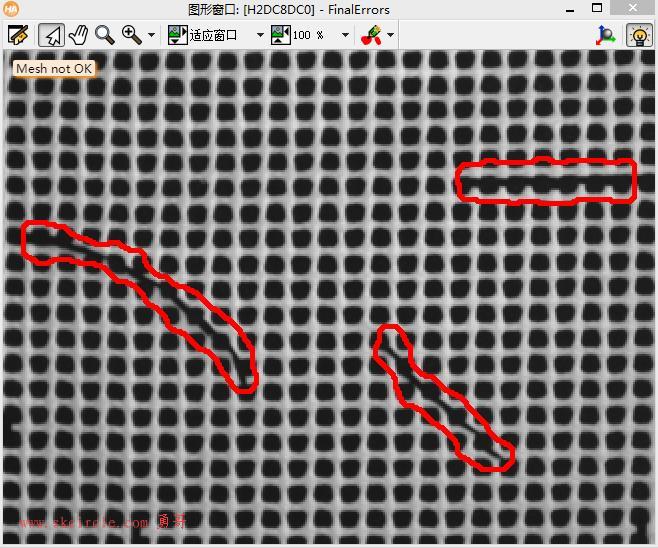
disp_message (WindowHandle, 'Mesh not OK', 'window', 10, 10, 'black', 'true')
else
disp_message (WindowHandle, 'Mesh OK', 'window', 10, 10, 'black', 'true')
endif
if (J < 14)
disp_continue_message (WindowHandle, 'black', 'true')
endif
stop ()
endfor
clear_class_mlp (MLPHandle)本地函数的源码:
texture_laws (Image, ImageEL, 'el', 5, 5)
texture_laws (Image, ImageLE, 'le', 5, 5)
texture_laws (Image, ImageES, 'es', 1, 5)
texture_laws (Image, ImageSE, 'se', 1, 5)
texture_laws (Image, ImageEE, 'ee', 2, 5)
compose5 (ImageEL, ImageLE, ImageES, ImageSE, ImageEE, ImageLaws)
smooth_image (ImageLaws, ImageTexture, 'gauss', 5)
return ()
可以看到,我们实现了跟gmm一样的效果。
---------------------
作者:hackpig
来源:www.skcircle.com
版权声明:本文为博主原创文章,转载请附上博文链接!
本文出自勇哥的网站《少有人走的路》wwww.skcircle.com,转载请注明出处!讨论可扫码加群:


")
")
常用的6种方法")
 封装运动功能")
一个完整的测试设备")

")


Qt Widgets Designer界面设计器和界面应用")
:if的bool判断, 变量的作用域范围, 格式字符串, 弹窗, 列表推导式, 一个点歌小程序")