 少有人走的路
1,Data Binding在WPF中的地位
程序的本质是数据+算法。数据会在存储、逻辑和界面三层之间流通,所以站在数据的角度上来看,这三层都很重要。但算法在3层中的分布是不均匀的,对于一个3层结构的程序来说,算法一般分布在这几处:
A。数据库内部。
B。读取和写回数据。
C。业务逻辑。
D。数据展示。
E。界面与逻辑的交互。
A,B两部分的算法一般都非常稳定,不会轻易去改动,复用性也很高;C处与客户需求最紧密,最复杂,变化最大,大多少算法都集中在这里。D,E负责UI和逻辑的交互,也占有一定量的算法。
显然,C部分是程序的核心,是开发的重中之重,所以我们应该把精力集中在C部分。然而,D,E两部分却经常成为麻烦的来源。首先这两部分都与逻辑紧密相关,一不小心就有可能把本来该放在逻辑层里面的算法写进这两部分(所以才有了MVC、MVP等模式来避免这种情况出现)。其次,这两部分以消息或者事件的方式与逻辑层沟通,一旦出现同一个数据需要在多出展示/修改时,用于同步的代码错综复杂;最后,D和E本来是互逆的一对儿。但却需要分开来写-----显示数据写一个算法,修改数据再写一个算法。总之导致的结果就是D和E两部分会占去一部分算法,搞不好还会牵扯不少精力。
问题的根源在于逻辑层和展示层的地位不固定------当实现客户需求的时候,逻辑层的确处于核心地位。但到了实现UI的时候,展示层又处于核心的地位。WPF作为一种专业的展示层技术,华丽的外观和动画只是它的表层现象,最重要的是他在深层次上把程序员的思维固定在了逻辑层,让展示层永远处于逻辑层的从属地位。WPF具有这种能力的关键在于它引入了Data Binding概念及与之配套的Dependency Property系统和DataTemplate。
从传统的Winform转移到WPF上,对于一个三层程序而言,数据存储层由数据库和文件系统组成,数据传输和处理仍然使用.NetFramework的ADO.NET等基本类(与Winform开发一样)。展示层则使用WPF类库来实现,而展示层和逻辑层的沟通就使用Data Binding来实现。可见,Data Binding在WPF中所起的作用就是高速公路的作用。有了这条高速公路,加工好的数据自动送达用户界面并加以显示,被用户修改过的数据也会自动传回业务逻辑层,一旦数据被加工好又会被送往界面。。。。程序的逻辑层就像是一个强有力的引擎一直在运作,用加工好的数据驱动用户界面也文字、图形、动画等形式把数据显示出来------这就是数据驱动UI。
引入Data Binding之后,D,E两部分被简化了很多。首先,数据在逻辑层和用户界面直来之去、不涉及逻辑问题,这样的用户界面部分基本上不包含算法:Data Binding本身就是双向通信,所以相当于把D和E合二为一;对于多个UI元素关注同一个数据的情况,只需要用Data Binding将这些UI元素和数据一一关联上(以数据为中心的星形结构),当数据变化后,这些UI元素会同步显示这一变化。前面提到的问题也都迎刃而解了。更重要的是经过这样的优化,所有与业务逻辑相关的算法都处在业务逻辑层,逻辑层成了一个可以独立运转,完整的体系,而用户界面则不需要任何逻辑代码。完全依赖和从属于业务逻辑层。这样做有两个显而易见的好处,第一:如果把UI看做是应用程序的皮,把存储层和逻辑层看作是程序的瓤,我们可以很轻易的把皮撕下来换一个新的。第二:因为数据层能够独立运作,自成体系,所以我们可以进行更完善的单元测试而无需借助UI自动化测试工具----你完全可以把单元测试看作是一个“看不见的UI”,单元测试只是使用这个UI绕过真实的UI直接测试业务逻辑罢了。
2 , Binding 基础
如果把Binding比作数据的桥梁,那么它的两端分别是源(Source)和目标(Target)。数据丛哪里来哪里就是源,到哪里去哪里就是目标。一般情况下,Binding的源是业务逻辑层的对象,Binding的目标是UI层的控件对象。这样数据就会源源不断的通过Binding送达UI界面,被UI层展现,这就完成了数据驱动UI的过程。有了这座桥梁,我们不仅可以控制车辆在源与目标之间是双向通行还是单向通行。还可以控制数据的放行时机,甚至可以在桥上搭建一些关卡用来转换数据类型或者检验数据的正确性。
通过对Binding有了一个基本概念之后,让我们看一个最基本的例子。这个例子是创建一个简单的数据源并通过Binding把它连接到UI元素上。
首先,我们创建一个名为"Student"的类,这个类的实例将作为数据源来使用。
public class Student
    {
        private string name;

        public string Name
        {
            get { return name; }
            set
            {
                name = value;
        }
    }
这个类很简单,简单到只有一个string类型的Name属性。前面说过数据源是一个对象,一个对象本身可能会有很多数据,这些数据又通过属性暴露给外界。那么其中哪个元素是你想通过Binding送达UI元素的呢,换句话说,UI元素关心的是哪个属性值的变化呢?这个属性值称之为Binding的路径(Path)。但光有属性还不行-------Binding是一种自动机制,当值变化后属性要有能力通知Binding,让Binding把变化传递给UI元素。怎样才能让一个属性具备这种通知Binding值已经改变的能力呢?方法是在属性的Set语句中激发一个PropertyChanged事件。这个事件不需要我们自己声明,我们要做的事是让作为数据源的类实现System.ComponentModel名称空间中的INotifyPropertyChanged接口。当为Binding设置了数据源之后,Binding就会自动侦听来自这个接口PropertyChanged事件。
实现INotifyPropertyChanged接口的类看起来是这样:
public class Student : INotifyPropertyChanged
    {
        private string name;

        public string Name
        {
            get { return name; }
            set
            {
                name = value;
                if (PropertyChanged != null)
                {
                    this.PropertyChanged.Invoke(this, new PropertyChangedEventArgs("Name"));
                }
            }
        }
        public event PropertyChangedEventHandler PropertyChanged;
    }
经过这样一升级,当Name属性的值发生变化时PropertyChanged事件就会被激发,Binding接收到这个事件后发现事件的消息告诉它是Name属性值发生了变化,于是通知Binding目标端的UI元素显示新的值。
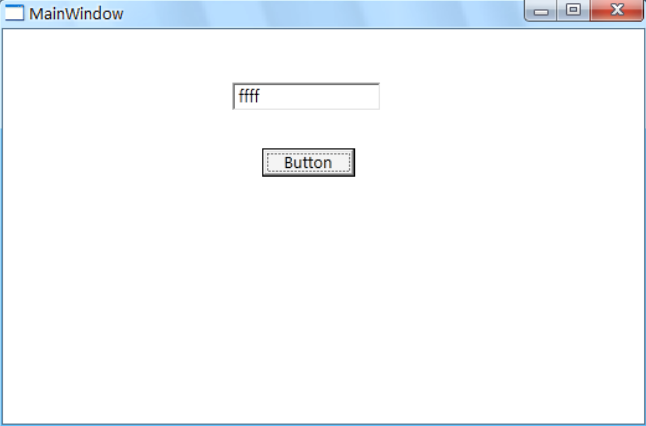
然后我们在窗体上准备一个TextBox和Button,代码如下:
<Window x:Class="WpfApplication1.MainWindow"
        xmlns="http://schemas.microsoft.com/winfx/2006/xaml/presentation"
        xmlns:x="http://schemas.microsoft.com/winfx/2006/xaml"
        Title="MainWindow" Height="350" Width="525">
    <Grid>
        <TextBox Height="23" HorizontalAlignment="Left" Margin="185,43,0,0" Name="textBox1" VerticalAlignment="Top" Width="120" />
        <Button Content="Button" Height="23" HorizontalAlignment="Left" Margin="209,96,0,0" Name="button1" VerticalAlignment="Top" Width="75" Click="button1_Click" />
    </Grid>
</Window>
后台代码这样写:
/// <summary>
    /// MainWindow.xaml 的交互逻辑
    /// </summary>
    public partial class MainWindow : Window
    {
        Student stu = null;
        public MainWindow()
        {
            InitializeComponent();
            stu = new Student();
            Binding bind = new Binding();
            bind.Source = stu;
            bind.Path = new PropertyPath("Name");
            this.textBox1.SetBinding(TextBox.TextProperty, bind);

        }

        private void button1_Click(object sender, RoutedEventArgs e)
        {
            stu.Name += "f";
            new Window1().Show();
        }
    }
让我们逐句解释一下这段代码,这段代码是MainWIndow的后台代码,它的前端代码就是上面的XAML代码。“Student stu;”是为MainWindow声明一个Student类型的成员变量,这样做的目的是为了在MainWindow的构造器和Button.Click事件处理器中都可以访问到由它引用的Student实例(数据源)。
在MainWindow的构造器中“InitializeComponent();”是自动生成的代码,用途是初始化UI元素。“stu=new Student();”这句是创建一个Student实例并用stu成员变量引用它,这个对象就是我们的数据源。
在准备Binding的部分,先使用“Binding bind = new Binding();”声明Binding类型变量并创建实例,然后使用“bind.Source=stu;”为Binding实例指定数据源,最后使用“bind.Path= new PropertyPath('Name')”语句为Binding指定访问路径。
把数据源和目标连接在一起的任务是使用“BindingOperations.SetBinding(...)”方法完成的,这个方法的3个参数是我们记忆的重点:
第一个参数是指定Binding的目标,本例中的this.textBoxName。
与数据源的Path原理类似,第二个参数用于为Binding指明为Binding指明把这个数据送达目标的哪个数据。
第三个参数很明显,就是指定使用哪个Binding实例将数据源和目标关联起来。
运行程序,单击按钮我们将会看到如下的效果图:
通过上面的例子,我们已经在头脑中建立起来如图所示的模型
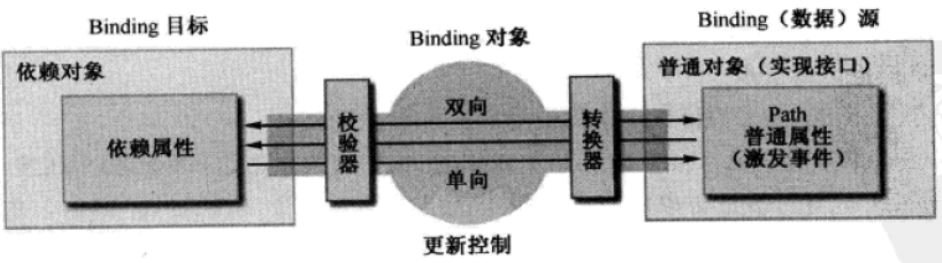
先用这个做基础,后面我们将研究Binding的每个特点。
1.3 Binding的源与路径
Binding 的源也就是数据的源头。Binding对源的要求并不苛刻------只要它是一个对象,并且通过属性(Property)公开自己的数据,它就能作为Binding 的源。
前面一个例子已经向大家证明,如果想让作为Binding源的对象具有自动通知Binding自己属性值已经已经变化的能力。那么就需要让类实现INotifyChanged接口并在属性的Set语句中激发PropertyChanged事件。在日常生活中,除了使用这种对象作为数据源之外,我们还有更多的选择,比如控件把自己的容器或子集元素当源、用一个控件做为另一个控件的数据源,把集合作为ItemControl的数据源、使用XML作为TreeView或Menu的数据源。把多个控件关联到一个“数据制高点”上,甚至干脆不给Binding指定数据源、让他自己去找。下面我们就分述这些情况。
1.3.1 把控件作为Binding源与Binding标记扩展。
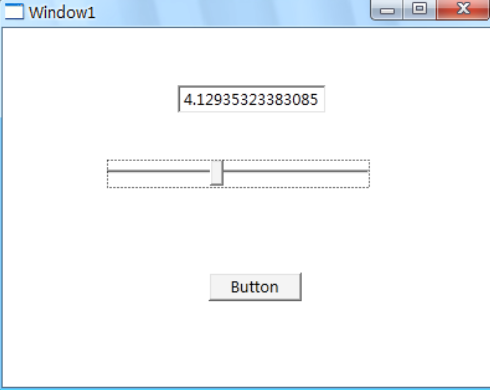
前面讲过,大多数情况下Binding的源是逻辑层对象,但有的时候为了让UI产生联动效果也会使用Binding在控件间建立关联。下面的代码是吧一个TextBox的Text属性关联到Slider的Value的属性上。
<Window x:Class="WpfApplication1.Window1"
        xmlns="http://schemas.microsoft.com/winfx/2006/xaml/presentation"
        xmlns:x="http://schemas.microsoft.com/winfx/2006/xaml"
        Title="Window1" Height="321" Width="401">
    <Grid>
        <TextBox Height="23" HorizontalAlignment="Left" Margin="141,46,0,0" Name="textBox1" VerticalAlignment="Top" Width="120" Text="{Binding Path=Value,ElementName=slider1}"/>
        <Slider Height="23" HorizontalAlignment="Left" Margin="84,106,0,0" Name="slider1" VerticalAlignment="Top" Width="212" />
        <Button Content="Button" Height="23" HorizontalAlignment="Left" Margin="166,197,0,0" Name="button1" VerticalAlignment="Top" Width="75" Click="button1_Click" />
    </Grid>
</Window>
运行效果如下图:
正如大家所见,除了可以在C#中建立Binding外在XAML代码里也可以方便的设置Binding,这就给设计师很大的自由度来决定UI元素之间的关联情况。值得注意的是,在C#代码中,可以访问在XAML中声明的变量但是XAML中不能访问C#中声明的变量,因此,要想在XAML中建立UI元素和逻辑对象的Binding还要颇费些周折,把逻辑代码声明为XAML中的资源(Resource),我们放资源一章去讲。
回头来看XAML代码,它使用了Binding标记扩展语法:
<TextBox Height="23" HorizontalAlignment="Left" Margin="141,46,0,0" Name="textBox1" VerticalAlignment="Top" Width="120" Text="{Binding Path=Value,ElementName=slider1}"/>与之等价的C#代码是:
this.textBox1.SetBinding(TextBox.TextProperty, new Binding("Value") { ElementName="Slider1"});因为Binding类的构造器本身具有可以接收Path的参数,所以也常写作:
<TextBox Height="23" HorizontalAlignment="Left" Margin="141,46,0,0" Name="textBox1" VerticalAlignment="Top" Width="120" Text="{Binding Value,ElementName=slider1}"/>注意:
因为我们在C#代码中可以直接访问控件对象,所以一般不会使用Binding的ElementName属性,而是直接赋值给Binding的Sourece属性。
Binding的标记扩展语法,初看有些平淡甚至有些别扭,但细品就会体验到其的精巧之处。说它别扭,是因为我们已经习惯了Text=“Hello World”这种键--值式的赋值方式,而且认为值与属性的值类型一定要一致-------大脑很快会质询Text="{Binding Value,ElementName=Slider1}"的字面意思----Text的类型是String,为什么要赋一个Binding类型的值呢?其实我们并不是为Text属性赋值,为了消除这种误会,我们可以把代码读作:为Text属性设置Binding为...。再想深一步,我们不是经常把函数视为一个值吗?只是这个值在函数执行之后才能得到。同理,我们也可以把Binding视为一种间接的、不固定的赋值方式-----Binding扩展很恰当的表达了这个赋值方式。
1.3.2 控制Binding的方向及数据更新
Binding在源与目标之间架起了沟通的桥梁,默认情况下数据即可以通过Binding送达目标,也可以通过目标回到源(收集用户对数据的修改)。有时候数据只需要展示给用户,不需要用户修改,这时候可以把Binding模式设置为从目标向源的单向沟通以及只在Binding关系确立时读取一次数据,这需要我们根据实际情况选择。
控制Binding数据流向的属性是Model,它的类型是BindingModel的枚举。BindingModel可以取值为TwoWay、OneWay、OneTime、OneWayToSource和Default。这里的Default指的是Binding的模式会根据目标是实际情况来确定,不如是可以编辑的(TextBox的Text属性),Default就采用双向模式。如果是TextBlock,不可编辑,就使用单向模式。
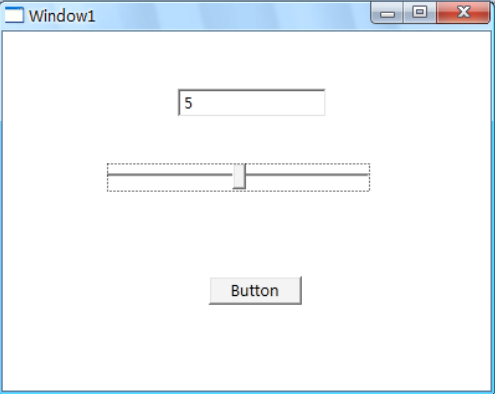
接上一节的小例子,拖动Slider手柄时,TextBox就会显示Slider的当前值(实际上这一块涉及到一个Double到String类型的转换,暂且忽略不计);如果我们在TextBox里面输入一个恰当的值按Tab键、让焦点离开TextBox,则Slider手柄就会跳转至相应的值那里。如下图所示:
为什么一定要在TextBox失去焦点以后才改变值呢?这就引出了Binding的另外一个属性-----UpdateSourceTrigger,它的类型是UpdateSourceTrigger枚举,可取值为PropertyChanged、LostFous、Explicit和Default。显然,对于Text的Default行为与LostFocus一致,我们只需要把这个值改成PropertyChanged,则Slider就会随着输入值的变化而变化了。
注意:
顺便提一句,Binding还具有NotifyOnSourceUpdated属性和NotifyOnTargetUpdated两个bool类型是属性。如果设置为True,则在源或目标被更新以后就会触发相应的SourceUpdated事件和TargetUpdated事件。实际工作中我们可以监听这两个事件来找出来哪些数据或控件被更新了。
1.3.3 Binding的路径(Path)
做为Binding的源可能会有很多属性,通过这些属性Binding源可以把数据暴露给外界。那么,Binding到底需要关注哪个属性值呢?就需要用Binding的Path属性来指定了。例如前面这个例子,我们把Slider控件对象作为数据源,把它的Value属性作为路径。
尽管在XAML代码中或者Binding类的构造器参数列表中我们使用字符串来表示Path,但Path的实际类型是PropertyPath。下面让我们来看看如何创建Path来应付实际情况(我将使用C#和XAML两种代码进行描述)。
最简单的方法就是直接把Binding关联到Binding源的属性上,前面的例子就是这样,语法如下:
<TextBox Height="23" HorizontalAlignment="Left" Margin="141,46,0,0" Name="textBox1" VerticalAlignment="Top" Width="120" Text="{Binding Path=Value,ElementName=slider1}"/>等效的C#代码就是:
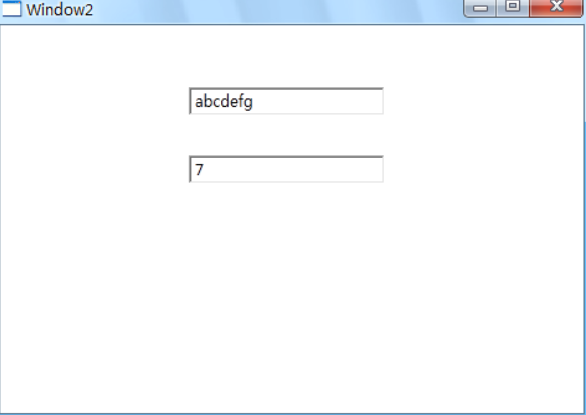
this.textBox1.SetBinding(TextBox.TextProperty, new Binding("Value") {Source=slider1});Binding还支持多级路径(通俗的讲就是一路“点”下去),比如,我们想让一个TextBox显示另外一个TextBox内容的长度,我们可以这样写:
<TextBox Height="23" HorizontalAlignment="Left" Margin="152,50,0,0" Name="textBox1" VerticalAlignment="Top" Width="158" />
        <TextBox Height="23" HorizontalAlignment="Left" Margin="152,105,0,0" Name="textBox2" Text="{Binding Path=Text.Length,ElementName=textBox1,Mode=OneWay}" VerticalAlignment="Top" Width="158"/>
等效的C#代码是:
this.textBox2.SetBinding(TextBox.TextProperty, new Binding("Text.Length") {Source = textBox1, Mode= BindingMode.OneWay });运行效果如下图:
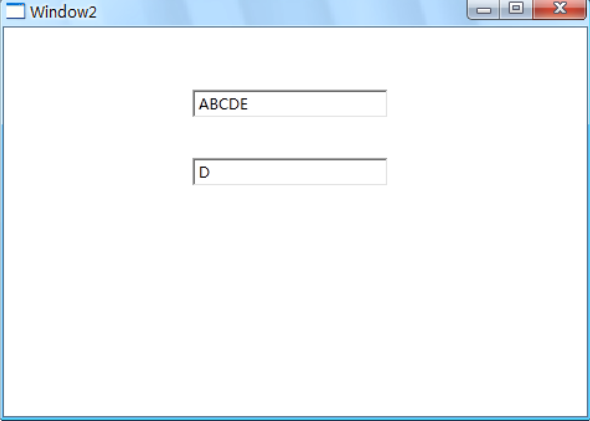
我们知道,集合类型是索引器(Indexer)又称为带参属性。既然是属性,索引器也能作为Path来使用。比如我们想让一个TextBox显示另外一个TextBox的第4个字符,我们可以这样写:
 <TextBox Height="23" HorizontalAlignment="Left" Margin="152,50,0,0" Name="textBox1" VerticalAlignment="Top" Width="158" Text="ABCDE" />
        <TextBox Height="23" HorizontalAlignment="Left" Margin="152,105,0,0" Name="textBox2" Text="{Binding Path=Text[3],ElementName=textBox1,Mode=OneWay}" VerticalAlignment="Top" Width="158"/>
C#代码如下:
this.textBox2.SetBinding(TextBox.TextProperty, new Binding("Text.[3]") { Source=textBox1,Mode= BindingMode.OneWay});我们甚至可以把Text与[3]之间的点去掉,一样可以正确工作,运行效果如下图:
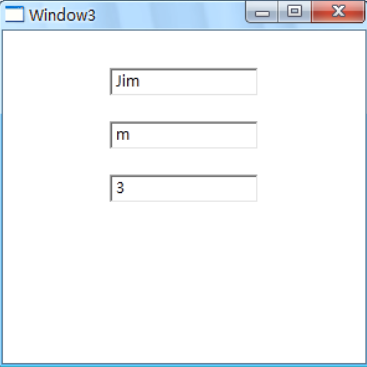
当使用一个集合或者DataView做为数据源时,如果我们想把它默认的元素做为数据源使用,则需要使用下面的语法:
List<string> infos = new List<string>() { "Jim","Darren","Jacky"};
            textBox1.SetBinding(TextBox.TextProperty, new Binding("/") { Source=infos});
            textBox2.SetBinding(TextBox.TextProperty, new Binding("/[2]") { Source = infos, Mode= BindingMode.OneWay });
            textBox3.SetBinding(TextBox.TextProperty, new Binding("/Length") { Source = infos, Mode= BindingMode.OneWay });
显示效果如下:
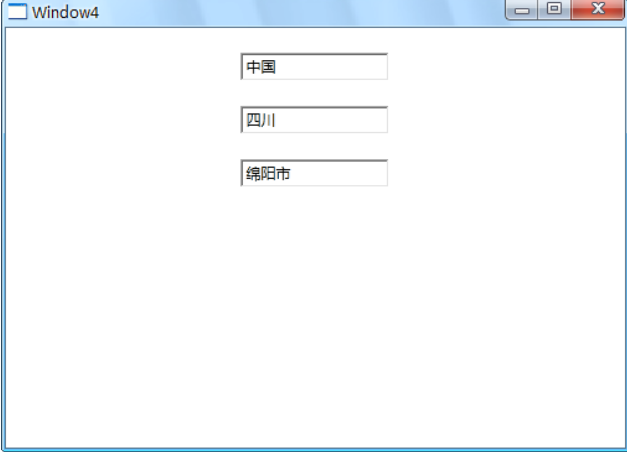
如果集合中仍然是集合,我们想把子集集合中的元素做Path,我们可以使用多级斜线的语法(即“一路”斜线下去),例如:
/// <summary>
    /// Window4.xaml 的交互逻辑
    /// </summary>
    public partial class Window4 : Window
    {
        public Window4()
        {
            InitializeComponent();
            List<Contry> infos = new List<Contry>() { new Contry() { Name = "中国", Provinces= new List<Province>(){ new Province(){ Name="四川",Citys=new List<City>(){new  City(){Name="绵阳市"
            }}}}}};
            this.textBox1.SetBinding(TextBox.TextProperty, new Binding("/Name") { Source=infos});
            this.textBox2.SetBinding(TextBox.TextProperty, new Binding("/Provinces/Name") { Source = infos });
            this.textBox3.SetBinding(TextBox.TextProperty, new Binding("/Provinces/Citys/Name") { Source = infos });
        }
    }

     class City
    {
        public string Name { set; get; }
    }

    class Province
    {
        public string Name { set; get; }
        public List<City> Citys { set; get; }
    }

    class Contry
    {
        public string Name { set; get; }
        public List<Province> Provinces { get; set; }
    }
运行效果如图:
1.3.4 "没有Path"的Binding
有的时候我们会在代码中我们看大Path是一个“.”或者干脆没有Path的Binding,着实让人摸不着头脑。原来这是一种比较特殊的情况---Binding源本身就是一种数据且不需要Path来指明。典型的string,int等基本类型都是这样,他们是实例本身就是数据,我们无法指定通过那个属性来访问这个数据,这是我们只需要将这个数据设置为.就可以了。在XAML中这个.可以忽略不写,但是在C#中编程必须要带上。下面请看下面这段代码:
<Window x:Class="WpfApplication1.Window5"
        xmlns="http://schemas.microsoft.com/winfx/2006/xaml/presentation"
        xmlns:x="http://schemas.microsoft.com/winfx/2006/xaml"
        xmlns:String="clr-namespace:System;assembly=mscorlib"
        Title="Window5" Height="331" Width="538">
    <StackPanel Height="184" Name="stackPanel1" Width="288">
        <StackPanel.Resources>
            <String:String x:Key="myString">
                菩提本无树,何处染尘埃。
            </String:String>

        </StackPanel.Resources>
        <TextBlock Height="23" Name="textBlock1" Text="{Binding Path=.,Source={StaticResource ResourceKey=myString}}" />
    </StackPanel>
</Window>
上面的代码可以简写成:
<TextBlock Height="23" Name="textBlock1" Text="{Binding .,Source={StaticResource ResourceKey=myString}}" />或者直接写成:
<TextBlock Height="23" Name="textBlock1" Text="{Binding Source={StaticResource ResourceKey=myString}}" />注意:
最后这种简写很容易被误解为没有指定Path,其实只是省略掉了。与只等效的C#代码如下:
 string myString = "菩提本无树,明镜亦无台。本来无一物,何处染尘埃。";
            this.textBlock1.SetBinding(TextBlock.TextProperty, new Binding(".") { Source=myString});
注意:
最后顺便带一句,PropertyPath除了用于Binding的Path属性之外,在动画编程的时候也会派上用场(Storyboard.TargetProperty)。在用于动画编程的时候,PropertyPath还有另外一种语法,到时候我们细说。
1.3.5 把Binding指定为源(Source)的几种方法
上一节我们学习了如何通过Binding的path属性如何在一个对象上寻找数据。这一节我们将学习如何为Binding指定源(Source)。
Binding的源是数据的来源,所以,只要一个对象包含数据并且能够通过属性将数据暴露出来,它就能当作Binding的源来使用。包含数据的对象比比皆是,但必须为Binding的Source指定合适的对象Binding才能正常工作,常用的办法有:
把普通的CLR单个对象指定为Source:包括.NetFrameWork自带类型的对象和用户自定义类型的对象。如果类型实现了INotifyPropertyChanged接口,这可以通过在属性的Set语句里激发PropertyChanged事件来通知Binding已经更新。
把普通的CLR对象集合指定为Source:包括数组,List<T>,ObservableCollection<T>等集合类型。实际工作中,我们经常需要将一个集合类型作为ItemControl的派生类的数据来使用,一般把控件ItemSource属性使用Binding关联到一个集合对象上。
把ADO.NET数据指定为Source:包括DataTable和DataView对象。
使用XmlDataProvider把XML数据指定为Source:XML做为标准的数据传输和存储格式,几乎无处不在,我们可以用它表示单个对象或者集合对象;一些WPF控件是级联的(如Treeview和Menu),我们可以把树状结构的XML数据作为源指定给与之关联的Binding。
把依赖对象(Dependency Object)指定为Source:依赖对象不仅可以做为Binding 的目标,还能作为Binding 的源。这样就有可能形成Binding链。依赖对象中的依赖属性可以做为Binding的Path。
把容器的DataContext指定为Source(WPF 中Binding的默认行为):有时候我们会遇到这样一种情况----我们明确知道将从那个属性获取数据,但具体使用哪个对象作为Binding的源还不确定。这时候我们只需要先建立一个Binding,只给它设置Path而不设置Source,让这个Binding自己去寻找源,这时候,Binding会自动把控件的DataContext作为当作自己的Source(它会沿着控件树一直向外找,直到找到带有Path指定的对象为止)。
通过ElementName指定Source:在C#代码中可以直接把对象作为Source赋值给Binding,但是XAML无法访问对象,只能使用Name属性来找到对象。
通过Binding的RelataveSource属性相对的指定Source:当控件需要关注自己的、自己容器的或者自己内部某个属性值就需要使用这种办法。
把ObjectDataProvider指定为Source:当数据源的数据不是通过属性,而是通过方法暴露给外界的时候,我们可以使用这种对象来包装数据源再把它们指定为Source。
把使用LINQ检索到的数据作为数据源。
下面我们使用实例来分别描述每种情况:
1.3.6 没有Source的Binding----使用DataContext作为数据源
前面的例子都是把单个的CLR对象作为Binding 的源,方法有两种:把对象赋值给Binding.Source属性或者把对象的Name赋值给Binding.ElementName。DataContext被定义在FrameWorkElement类中,这个类是WPF控件的基类,这意味着所有的WPF控件包括布局控件都包含这个属性。如前所述,WPF的UI布局是树形结构,这个树的每个节点都是控件,由此我们推出一个结论----在UI树的每个节点都有DataContext属性。这一点非常重要,因为当一个Binding只知道自己的Path而不知道自己的源的时候,它会沿着树的一路向树的根部找过去,每经过一个节点都要查看这个节点的DataContext属性是否具有Path所指定的属性。如果有,就把这个对象作为自己的Source;如果没有,就继续找下去;如果到树的根部还没有找到,那这个Binding就没有Source,因而也不会得到数据,让我们看看下面的例子:
先创建一个名为Student的类,它具有ID,Name,Age3个属性:
public class Student
    {
        public int Id { get; set; }
        public string Name { get; set; }
        public int Age { get; set; }
    }
在后在XAML中建立UI界面:
<Window x:Class="WpfApplication1.Window6"
xmlns="http://schemas.microsoft.com/winfx/2006/xaml/presentation"
xmlns:x="http://schemas.microsoft.com/winfx/2006/xaml"
xmlns:Stu="clr-namespace:WpfApplication1"
Title="Window6" Height="345" Width="464">
<StackPanel Background="AliceBlue">
<StackPanel.DataContext>
<Stu:Student Id="1" Name="Darren" Age="10"></Stu:Student>
</StackPanel.DataContext>
<Grid>
<StackPanel Height="283" HorizontalAlignment="Left" Margin="12,12,0,0" Name="stackPanel1" VerticalAlignment="Top" Width="418">
<TextBox Height="23" Name="textBox1" Width="120" Margin="15" Text="{Binding Path=Id}"/>
<TextBox Height="23" Name="textBox2" Width="120" Margin="15" Text="{Binding Path=Name}"/>
<TextBox Height="23" Name="textBox3" Width="120" Margin="15" Text="{Binding Path=Age}"/>
</StackPanel>
</Grid>
</StackPanel>
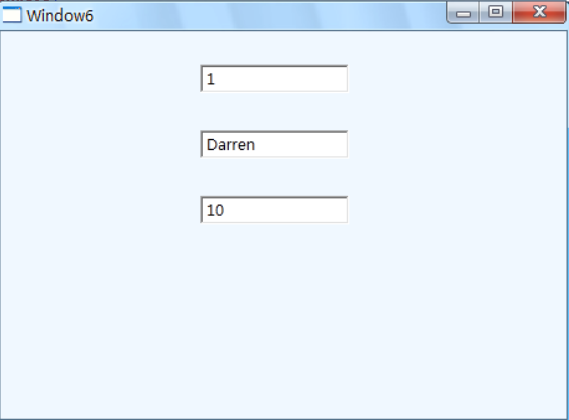
</Window>这个UI可以用如下的柱状图来表示:

使用xmlns:Stu="clr-namespace:WpfApplication1",我们就可以在XAML中使用在C#中定义的类。使用了这几行代码:
<StackPanel.DataContext>
<Stu:Student Id="1" Name="Darren" Age="10"></Stu:Student>
</StackPanel.DataContext>
就为外层StackPanel的DataContext进行了赋值----它是一个Student对象。3个TextBox通过Binding获取值,但只为Binding指定了Path,没有指定Source。简写成这样也可以:
<TextBox Height="23" Name="textBox1" Width="120" Margin="15" Text="{Binding Id}"/>
                <TextBox Height="23" Name="textBox2" Width="120" Margin="15" Text="{Binding Name}"/>
                <TextBox Height="23" Name="textBox3" Width="120" Margin="15" Text="{Binding Age}"/>
这样3个TextBox就会沿着树向上寻找可用的DataContext对象。运行效果如下图:
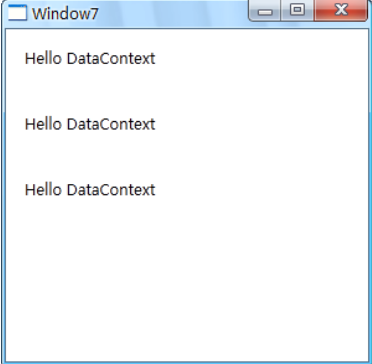
前面在学习Binding路径的时候,当Binding的Source本身就是数据、不需要使用属性来暴露数据时,Binding的Path可以设置为".",亦可省略不写。现在Source也可以省略不写了,这样,当某个DataContext为简单类型对象的时候,我们完全可能看到一个既没有Path,又没有Source的Binding:
<Window x:Class="WpfApplication1.Window7"
        xmlns="http://schemas.microsoft.com/winfx/2006/xaml/presentation"
        xmlns:x="http://schemas.microsoft.com/winfx/2006/xaml"
        xmlns:Str="clr-namespace:System;assembly=mscorlib"
        Title="Window7" Height="300" Width="300">
    <Grid>
        <Grid.DataContext>
            <Str:String>Hello DataContext</Str:String>
        </Grid.DataContext>
        <StackPanel>
            <TextBlock Height="23" HorizontalAlignment="Left" Margin="15" Name="textBlock1" Text="{Binding}" VerticalAlignment="Top" />
            <TextBlock Height="23" HorizontalAlignment="Left" Margin="15" Name="textBlock2" Text="{Binding}" VerticalAlignment="Top" />
            <TextBlock Height="23" HorizontalAlignment="Left" Margin="15" Name="textBlock3" Text="{Binding}" VerticalAlignment="Top" />
        </StackPanel>

    </Grid>
</Window>
运行效果如下图:
你可能回想,Binding怎么会自动向UI元素上一层查找DataContext并把它作为自己的Source呢?其实,“Binding沿着UI元素树向上找”只是WPF给我们的一个错觉,Binding并没有那么智能。之所以会这样是因为DataContext是一个“依赖属性”,后面的章节我们会详细描述,依赖属性有一个很明显的特点就是你没有为某个控件的依赖属性赋值的时候,控件会把自己容器的属性值接过来当作自己的属性值。实际上属性值是沿着UI元素树向下传递的。
在实际工作中,DataContext属性值的运用非常的灵活。比如:
当UI上的多个控件都使用Binding关注同一个对象变化的时候,不妨使用DataContext。
当作为Source的对象不能被直接访问的时候----比如B窗体内的控件想把A窗体里的控件当作自己的Binding源时,但是A窗体内的控件可访问级别是private类型,这是就可以把这个控件或者控件值作为窗体A的DataContext(这个属性是Public级别的)这样就可以暴露数据了。
形象的说,这时候外层的数据就相当于一个数据的“至高点”,只要把元素放上去,别人就能够看见。另外DataContext本身就是一个依赖属性,我们可以使用Binding把它关联到一个数据源上。
1.3.7 使用集合对象作为列表控件的ItemsSource
有了DataContext作为基础,我们再来看看把集合类型对象作为Binding源的情况。
WPF中的列表式控件都派生自ItemControl类,自然也继承了ItemSource这个属性。ItemSource可以接收一个IEnumerable接口派生类的实例作为自己的值(所有可被迭代遍历的集合都实现了这个接口,包括数组、List<T>等)。每个ItemControl都具有自己的条目容器Item Container,例如,ListBox的条目容器是ListBoxItem、Combox的条目容器是ComboxItem。ItemSource里面保存的是一条一条的数据,想要把数据显示出来就要为数据穿上外衣,条目容器就起到了数据外衣的作用。这样将数据外衣和它所对应的条目容器关联起来呢?当然时依靠Binding!只要我们为一个ItemControl设置了ItemSource属性值,ItemControl会自动迭代其中的数据元素,为每个数据元素准备一个条目容器,并使用Binding元素在条目容器和数据元素之间建立起关联,让我们来看一个例子:
UI代码如下:
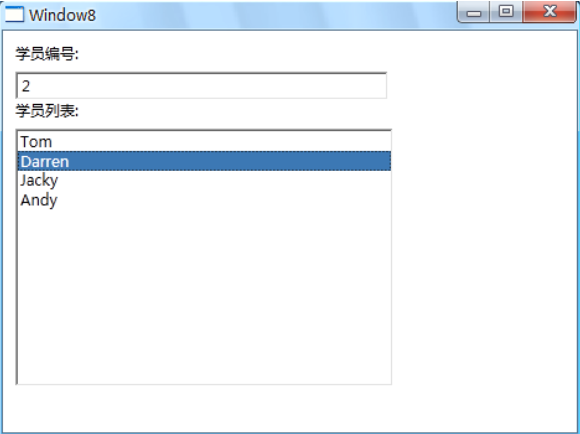
<Window x:Class="WpfApplication1.Window8"
        xmlns="http://schemas.microsoft.com/winfx/2006/xaml/presentation"
        xmlns:x="http://schemas.microsoft.com/winfx/2006/xaml"
        Title="Window8" Height="356" Width="471">
    <Grid>
        <StackPanel Height="295" HorizontalAlignment="Left" Margin="10,10,0,0" Name="stackPanel1" VerticalAlignment="Top" Width="427">
            <TextBlock Height="23" Name="textBlock1" Text="学员编号:" />
            <TextBox Height="23" Name="txtStudentId" Width="301" HorizontalAlignment="Left"/>
            <TextBlock Height="23" Name="textBlock2" Text="学员列表:" />
            <ListBox Height="208" Name="lbStudent" Width="305" HorizontalAlignment="Left"/>
        </StackPanel>
    </Grid>
</Window>
窗体运行效果如下图:

我们要实现的效果就是把List<Student>的集合作为ListBox的ItemSource,让ListBox显示学员的Name,并使用TextBox显示当前选中学员的Id,为了实现这个功能,我们需要在窗体的构造函数中添加几行代码:
List<Student> infos = new List<Student>() {
            new Student(){ Id=1, Age=11, Name="Tom"},
            new Student(){ Id=2, Age=12, Name="Darren"},
            new Student(){ Id=3, Age=13, Name="Jacky"},
            new Student(){ Id=4, Age=14, Name="Andy"}
            };
            this.lbStudent.ItemsSource = infos;
            this.lbStudent.DisplayMemberPath = "Name";

            this.txtStudentId.SetBinding(TextBox.TextProperty,new Binding("SelectedItem.Id"){ Source=lbStudent});
运行结果如下图:
你可能回想,这个例子中并没有出现刚才我们说的Binding。实际上, this.lbStudent.DisplayMemberPath = "Name";这点代码露出了一点蛛丝马迹。注意到包含Path这个单词了吗?这说明它是一个路径。当DisplayMemberPath 被赋值以后,ListBox在获得ItemSource的时候就会创建一个等量的ListBoxItem并以DisplayMemberPath的值为Path创建Binding,Binding的目标是ListBoxItem的内容插件(实际上是一个TextBox,下面就会看见)。
如过在ItemControl类的代码里刨根问底,你会发现Binding的过程是在DisplayMemberTemplateSelector类的SelectTemplate方法里完成的。这个方法的定义格式如下:
public override DataTemplate SelectTemplate(object item, DependencyObject container)
{
//逻辑代码
}
这里我们倒不必关心它的实际内容,注意到它的返回值没有,是一个DataTemplate类型的值。数据的外衣就是由DataTemplate穿上的!当我们没有为ItemControl显示的指定Template的时候SelectTemplate会默认的为我们创建一个最简单的DataTemplate----就好像给数据穿上了一个简单的衣服一样。至于什么是Template以及这个方法的完整代码将会放到与Template相关的文章中仔细去讨论。这里我们只关心SelectTemplate内部创建Binding 的几行关键代码:
FrameworkElementFactory text = ContentPresenter.CreateTextBlockFactory();
            Binding bind = new Binding();
            bind.Path = new PropertyPath(_displayMemberPath);
            bind.StringFormat = _stringFormat;
            text.SetBinding(TextBlock.TextProperty,bind);
注意:
这里对新创建的Binding设定了Path而没有指定Source,紧接这就把它关联到了TextBlock上。显然,要想得到Source,这个Binding需要向树根方向寻找包含_displayMemberPath指定属性的DataContext。
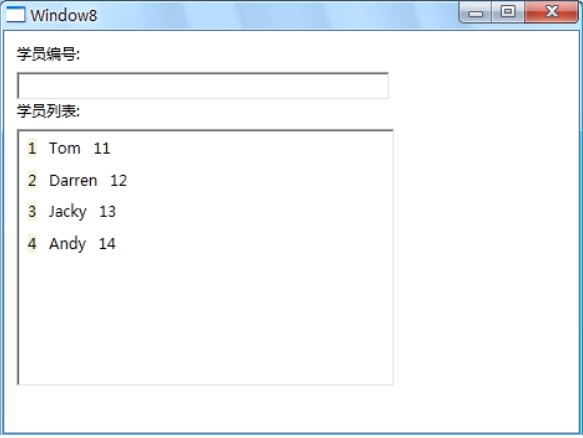
最后我们再看一个显示为数据设置DataTemplate的例子,先把C#代码中的this.lbStudent.DisplayMemberPath = "Name";一句删除,再在XAML代码中添加几行代码,ListBox的ItemTemplate属性(继承自ItemControl类)的类型是DataTemplate,下面我们就为Student类型实例量身定做“衣服”。
<Window x:Class="WpfApplication1.Window8"
        xmlns="http://schemas.microsoft.com/winfx/2006/xaml/presentation"
        xmlns:x="http://schemas.microsoft.com/winfx/2006/xaml"
        Title="Window8" Height="356" Width="471">
    <Grid>
        <StackPanel Height="295" HorizontalAlignment="Left" Margin="10,10,0,0" Name="stackPanel1" VerticalAlignment="Top" Width="427">
            <TextBlock Height="23" Name="textBlock1" Text="学员编号:" />
            <TextBox Height="23" Name="txtStudentId" Width="301" HorizontalAlignment="Left"/>
            <TextBlock Height="23" Name="textBlock2" Text="学员列表:" />
            <ListBox Height="208" Name="lbStudent" Width="305" HorizontalAlignment="Left">
                <ListBox.ItemTemplate>
                    <DataTemplate>
                        <StackPanel Name="stackPanel2" Orientation="Horizontal">
                            <TextBlock  Text="{Binding Id}" Margin="5" Background="Beige"/>
                            <TextBlock Text="{Binding Name}" Margin="5"/>
                            <TextBlock  Text="{Binding Age}" Margin="5"/>
                        </StackPanel>
                    </DataTemplate>
                </ListBox.ItemTemplate>
            </ListBox>

        </StackPanel>
    </Grid>
</Window>
运行效果图:
最后特别提醒大家一点:
在使用集合类型的数据作为列表控件的ItemSource时一般会考虑使用ObservableCollection<T>替换List<T>,因为ObservableCollection<T>类实现了INotifyChange和INotifyPropertyChanged接口,能把集合的变化立刻通知显示到它的列表控件上,改变会立刻显示出来。
1.3.8 使用ADO.NET对象作为Binding的源
在.Net开发工作中,我们用ADO.NET类对数据库进行操作。常见的工作就是从数据库中读取数据到DataTable中,在把DataTable里的数据绑定的UI的控件里面(如成绩单、博客列表)。尽管在流行的软件架构中并不把DataTable中的数据直接显示在UI列表控件里面而是先通过LINQ等手段把DataTable里的数据转换成恰当的用户自定义类型集合,但WPF也支持DataTable也支持在列表控件和DataTable里直接建立Binding。
现在我们做一个实例来讲解如何在DataTable和UI建立Binding:
多数情况下我们会用ListView控件来显示一个DataTable,XAML代码如下:
<Window x:Class="WpfApplication1.Window9"
        xmlns="http://schemas.microsoft.com/winfx/2006/xaml/presentation"
        xmlns:x="http://schemas.microsoft.com/winfx/2006/xaml"
        Title="Window9" Height="345" Width="482">
    <StackPanel Height="279" Name="stackPanel1" Width="431">
        <ListView Height="247" Name="listView1" Width="376">
            <ListView.View>
                <GridView>

                        <GridViewColumn Header="ID" DisplayMemberBinding="{Binding Id}" Width="60">

                        </GridViewColumn>
                        <GridViewColumn Header="Name" DisplayMemberBinding="{Binding Name}" Width="60">

                        </GridViewColumn>
                        <GridViewColumn Header="Age" DisplayMemberBinding="{Binding Age}" Width="60">

                        </GridViewColumn>
                        <GridViewColumn Header="Sex" DisplayMemberBinding="{Binding Sex}" Width="60">

                        </GridViewColumn>

                </GridView>
            </ListView.View>
        </ListView>
    </StackPanel>
</Window>
这里我们有几点需要注意的地方:
从字面上来理解,ListView和GridView应该属于同一级别的控件,实际上远非这样!ListView是ListBox的派生类而GridView是ViewBase的派生类,ListView中的View是一个ViewBase对象,所以,GridView可以做为ListView的View来使用而不能当作独立的控件来使用。这里使用理念是组合模式,即ListView有一个View,但是至于是GridView还是其它类型的View,由程序员自己选择----目前只有一个GridView可用,估计微软在这里还会有扩展。其次,GridView的内容属性是Columns,这个属性是GridViewColumnCollection类型对象。因为XAML支持对内容属性的简写,可以省略<GridView.Columns>这层标签,直接在GridView的内容部分定义3个<GridViewColumn>对象,GridViewColumn中最重要的一个属性是DisplayBinding(类型是BindingBase),使用这个属性可以指定这一列使用什么样的Binding去关联数据------这与ListBox有点不同,ListBox使用的是DisplayMemberPath属性(类型是string)。如果想用更复杂的结构来表示这一标题或数据,则可为GridViewColumn设置HeadTemplate和CellTemplate,它们的类型都是DataTemplate。
运行效果如下:
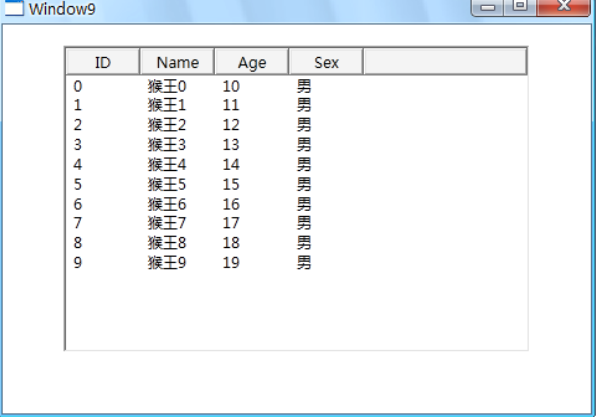
后台代码如下:
public Window9()
        {
            InitializeComponent();
            DataTable dtInfo = CreateDataTable();
            for (int i = 0; i < 10; i++)
            {
                DataRow dr = dtInfo.NewRow();
                dr[0] = i;
                dr[1] = "猴王" + i;
                dr[2] = i + 10;
                dr[3] = "男";
                dtInfo.Rows.Add(dr);
            }

            this.listView1.ItemsSource = dtInfo.DefaultView;
        }


        private DataTable CreateDataTable()
        {
            DataTable dt = new DataTable("newtable");

            DataColumn[] columns = new DataColumn[]{new DataColumn("Id"),new DataColumn("Name"),new DataColumn("Age"),new DataColumn("Sex")};
            dt.Columns.AddRange(columns);
            return dt;
        }
通过上面的例子我们已经知道DataTable的DefaultView可以做为ItemSource来使用,拿DataTable直接用可以吗,让我们试试看:
InitializeComponent();
            DataTable dtInfo = CreateDataTable();
            for (int i = 0; i < 10; i++)
            {
                DataRow dr = dtInfo.NewRow();
                dr[0] = i;
                dr[1] = "猴王" + i;
                dr[2] = i + 10;
                dr[3] = "男";
                dtInfo.Rows.Add(dr);
            }

            this.listView1.ItemsSource = dtInfo;
编译的时候系统会报错提示:
错误 1无法将类型“System.Data.DataTable”隐式转换为“System.Collections.IEnumerable”。存在一个显式转换(是否缺少强制转换?)d:\我的文档\visual studio 2010\Projects\WpfApplication2\WpfApplication1\Window9.xaml.cs3642WpfApplication1
显然DataTable不能直接拿来为ItemSource赋值。不过,当你把DataTable对象放在一个对象的Context属性的时候,并把一个ItemSource与一个既没有指定Source又没有指定Path的Binding绑定起来的时候,Binding却能自动找到它的DefaultView并当作自己的Source来使用:
DataTable dtInfo = CreateDataTable();
            for (int i = 0; i < 10; i++)
            {
                DataRow dr = dtInfo.NewRow();
                dr[0] = i;
                dr[1] = "猴王" + i;
                dr[2] = i + 10;
                dr[3] = "男";
                dtInfo.Rows.Add(dr);
            }

            this.listView1.DataContext = dtInfo;
            this.listView1.SetBinding(ListView.ItemsSourceProperty, new Binding());
所以,如果你在代码中发现把DataTable而不是DefaultView作为DataContext值,并且为ItemSource设置一个既无Path又没有Source的Binding的时候,千万别感觉到疑虑。
1.3.9 使用XML数据作为Binding的源
迄今为止,.NETFramWork提供了两套处理XML数据的类库:
符合DOM(Document Object Modle,文档对象模型)标准类库:包括XmlDocument、XmlElement、XmlNode、XmlAttribute等类。这套类库的特点是中规中矩,功能强大,但也背负了太多了XML的传统和复杂。
以LINQ(Language-Intergrated Query,语言集成查询)为基础的类库:包括XDocument,XElement,XNode,XAttribute等类。这套类库的特点是可以通过LINQ进行查询和操作,方便快捷。
下面我们主要讲解一下标准类型的类库,基于LINQ的查询我们放在下一节讨论。
现在程序设计只要涉及到远程传输就离不开XML,因为大多数数据传输是基于SOAP(Simple Object Access Protocol,简单对象访问协议)相关文档协议,而SOAP又是将对象序列化为XML文本进行传输。XML文本是树形结构的,所以XML可以方便的用于表示线性集合(如Array、List等)和树形结构数据。
注意:
在使用XML数据作为Binding的Source的时候我们将使用XPath属性而不是Path属性来指定数据的来源。
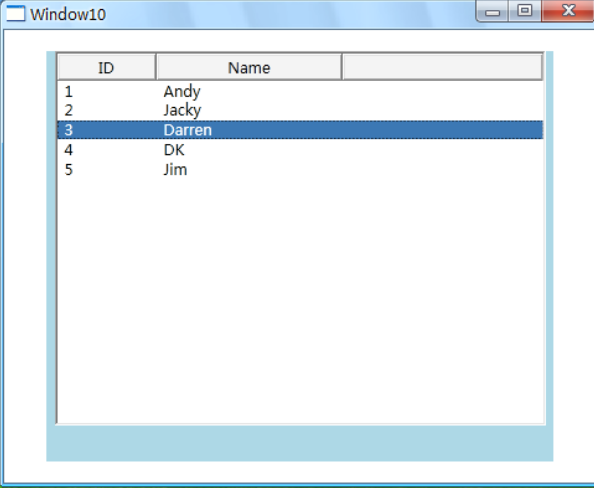
我们先看一个线性集合的例子。下面的XML文本是一组文本信息,我们要把它显示在一个ListView控件里:
<?xml version="1.0" encoding="utf-8" ?>
<StudentList>
  <Student id="1">
    <Name>Andy</Name>
  </Student>
  <Student id="2">
    <Name>Jacky</Name>
  </Student>
  <Student id="3">
    <Name>Darren</Name>
  </Student>
  <Student id="4">
    <Name>DK</Name>
  </Student>
  <Student id="1">
    <Name>Jim</Name>
  </Student>
</StudentList>
对应的XAML如下:
<Window x:Class="WpfApplication1.Window10"
        xmlns="http://schemas.microsoft.com/winfx/2006/xaml/presentation"
        xmlns:x="http://schemas.microsoft.com/winfx/2006/xaml"
        Title="Window10" Height="397" Width="485">
    <StackPanel Width="409" Height="331" Background="LightBlue">
        <ListView Height="302" Name="listView1" Width="396">
            <ListView.View>
                <GridView>
                    <GridViewColumn Header="ID" DisplayMemberBinding="{Binding XPath=@id}" Width="80">

                    </GridViewColumn>
                    <GridViewColumn Header="Name" DisplayMemberBinding="{Binding XPath=Name}" Width="150">

                    </GridViewColumn>
                </GridView>
            </ListView.View>
        </ListView>
    </StackPanel>
</Window>
C#代码如下:
 private void BindingInfo()
        {
            XmlDocument doc = new XmlDocument();
            doc.Load(@"d:\我的文档\visual studio 2010\Projects\WpfApplication2\WpfApplication1\StudentData.xml");

            XmlDataProvider dp = new XmlDataProvider();
            dp.Document = doc;

            dp.XPath = @"StudentList/Student";
            this.listView1.DataContext = dp;
            this.listView1.SetBinding(ListView.ItemsSourceProperty, new Binding());
        }
程序运行效果如下:
XMLDataProvider还有一个名为Source的属性,可以直接用它指定XML文档所在位置(无论是XML文档是存储在本地硬盘还是网络位置),所以,后台代码也可以写成如下:
private void BindingInfo()
{
//XmlDocument doc = new XmlDocument();
//doc.Load(@"d:\我的文档\visual studio 2010\Projects\WpfApplication2\WpfApplication1\StudentData.xml");
XmlDataProvider dp = new XmlDataProvider();
dp.Source = new Uri(@"d:\我的文档\visual studio 2010\Projects\WpfApplication2\WpfApplication1\StudentData.xml");
// dp.Document = doc;
dp.XPath = @"StudentList/Student";
this.listView1.DataContext = dp;
this.listView1.SetBinding(ListView.ItemsSourceProperty, new Binding());
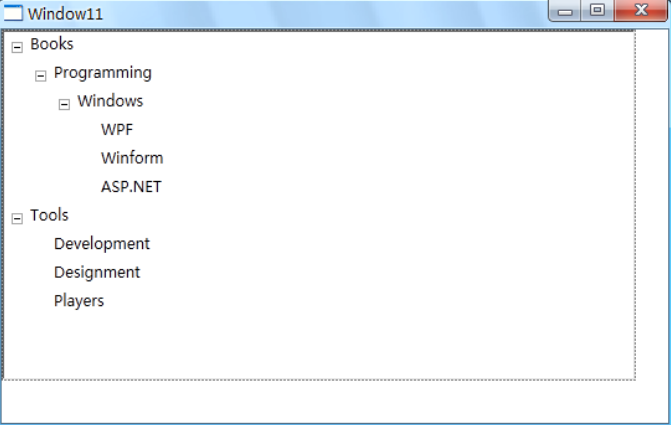
}XAML最关键的两句:DisplayMemberBinding="{Binding XPath=@id}"和DisplayMemberBinding="{Binding XPath=Name}",他们分别为GridView两列指定了要关注的XML路径----很明显,使用@符号加字符串表示的是XML元素的Attribute,不加@符号表示的是子级元素。<Window x:Class="WpfApplication1.Window11"
xmlns="http://schemas.microsoft.com/winfx/2006/xaml/presentation"
xmlns:x="http://schemas.microsoft.com/winfx/2006/xaml"
Title="Window11" Height="349" Width="545">
<Window.Resources>
<XmlDataProvider x:Key="xdp" XPath="FileSystem/Folder">
<x:XData>
<FileSystem xmlns="">
<Folder Name="Books">
<Folder Name="Programming">
<Folder Name="Windows">
<Folder Name="WPF">
</Folder>
<Folder Name="Winform">
</Folder>
<Folder Name="ASP.NET">
</Folder>
</Folder>
</Folder>
</Folder>
<Folder Name="Tools">
<Folder Name="Development"/>
<Folder Name="Designment"/>
<Folder Name="Players"/>
</Folder>
</FileSystem>
</x:XData>
</XmlDataProvider>
</Window.Resources>
<Grid>
<TreeView Height="283" HorizontalAlignment="Left" Name="treeView1" VerticalAlignment="Top" Width="511" ItemsSource="{Binding Source={StaticResource ResourceKey=xdp}}">
<TreeView.ItemTemplate>
<HierarchicalDataTemplate ItemsSource="{Binding XPath=Folder}">
<TextBlock Height="23" HorizontalAlignment="Left" Name="textBlock1" Text="{Binding XPath=@Name}" VerticalAlignment="Top" />
</HierarchicalDataTemplate>
</TreeView.ItemTemplate>
</TreeView>
</Grid>
</Window>注意:
将XmlDataProvider直接写在XAML代码里面,那么他的数据需要放在<x:XData>标签中。
由于本例子设计到了StaticResource和HierarchicalDataTemplate,都是后面的内容,相对比较难懂,等学习完后面的Resource和Template章节之后再回来便会了然于胸。
程序运行效果如下图:
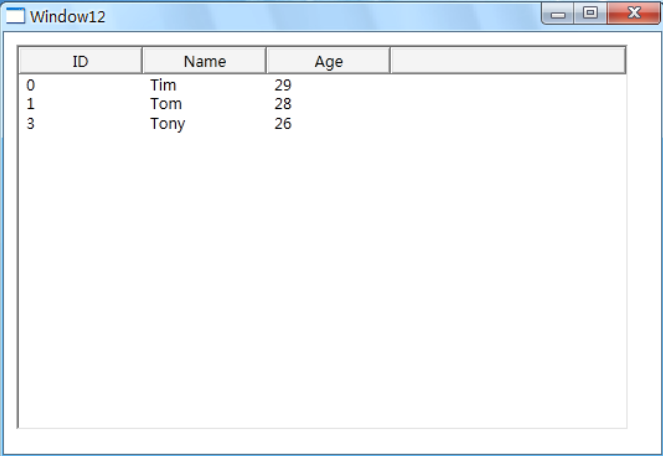
1.3.10 使用LINQ检索结果做为Binding 的源
至3.0版本开始,.NET Framework开始支持LINQ(Language-Intergrated Query 语言集成查询),使用LINQ,我们可以方便的操作集合对象、DataTable对象和XML对象不必动辄不动把好几层foreach循环嵌套在一起却只是为了完成一个很简单的任务。
LINQ查询的结果是一个IEnumerable<T>类型对象,而IEnumerable<T>又派生自IEnumerable,所以它可以作为列表控件的ItemsSource来使用。
先创建一个名为Student的类:
public class Student
    {
        public int Id { get; set; }
        public string Name { get; set; }
        public int Age { get; set; }
    }
XAML代码如下:
<Window x:Class="WpfApplication1.Window12"
        xmlns="http://schemas.microsoft.com/winfx/2006/xaml/presentation"
        xmlns:x="http://schemas.microsoft.com/winfx/2006/xaml"
        Title="Window12" Height="372" Width="538">
    <Grid>
        <ListView Height="311" HorizontalAlignment="Left" Margin="10,10,0,0" Name="listView1" VerticalAlignment="Top" Width="494">
            <ListView.View>
                <GridView>
                    <GridViewColumn Header="ID" DisplayMemberBinding="{Binding Id}" Width="100"/>
                    <GridViewColumn Header="Name" DisplayMemberBinding="{Binding Name}" Width="100"/>
                    <GridViewColumn Header="Age" DisplayMemberBinding="{Binding Age}" Width="100"/>
                </GridView>
            </ListView.View>
        </ListView>
    </Grid>
</Window>
后台代码如下:
private void BindingData()
        {
            List<Student> infos = new List<Student>()
            {
                new Student(){Id=1, Age=29, Name="Tim"},
                 new Student(){Id=1, Age=28, Name="Tom"},
                  new Student(){Id=1, Age=27, Name="Kyle"},
                   new Student(){Id=1, Age=26, Name="Tony"},
                    new Student(){Id=1, Age=25, Name="Vina"},
                     new Student(){Id=1, Age=24, Name="Mike"}
            };
            this.listView1.ItemsSource = from stu in infos where stu.Name.StartsWith("T") select stu;
        }
如果数据存放在一个DataTable对象里面,则后台代码如下:
private void BindingDataByDataTable()
        {
            DataTable dtInfo = CreateDataTable();
            this.listView1.ItemsSource = from row in dtInfo.Rows.Cast<DataRow>()
                                         where Convert.ToString(row["Name"]).StartsWith("T")
                                         select new Student()
                                         {
                                             Id = Convert.ToInt32(row["Id"]), Name=Convert.ToString(row["Name"]),Age=Convert.ToInt32(row["Age"])
                                         };

        }
如果数据存储在XML里面,存储格式如下:
<?xml version="1.0" encoding="utf-8" ?>
<StudentList>
  <Class>
    <Student Id="0" Age="29" Name="Tim" />
    <Student Id="0" Age="28" Name="Tom" />
    <Student Id="0" Age="27" Name="Mess" />
  </Class>
  <Class>
    <Student Id="0" Age="26" Name="Tony" />
    <Student Id="0" Age="25" Name="Vina" />
    <Student Id="0" Age="24" Name="Emily" />
  </Class>
</StudentList>
则代码是这样(注意:xd.Descendants("Student")这个方法,它可以跨XML的层级):
private void BindingDataByXml()
        {
            XDocument xd = XDocument.Load(@"d:\我的文档\visual studio 2010\Projects\WpfApplication2\WpfApplication1\testDate.xml");

            this.listView1.ItemsSource = from element in xd.Descendants("Student")
                                         where element.Attribute("Name").Value.StartsWith("T")
                                         select new Student()
                                             {
                                                 Name = element.Attribute("Name").Value,
                                                 Id = Convert.ToInt32(element.Attribute("Id").Value),
                                                 Age = Convert.ToInt32(element.Attribute("Age").Value)
                                             };
        }
程序运行效果如下图:
1.3.11 使用ObjectDataProvider作为binding的Source
理想情况下,上游程序员将类设计好、使用属性把数据暴露出来,下游程序员将这些类作为Binding的Source、把属性作为Binding的Path来消费这些类。但很难保证一个类的属性都用属性暴露出来,比如我们需要的数据可能是方法的返回值。而重新设计底层类的风险和成本会比较高,况且黑盒引用类库的情况下我们不可能更改已经编译好的类,这时候需要使用ObjectDataProvider来包装做为Binding源的数据对象了。
ObjcetDataProvider 顾名思义就是把对对象作为数据源提供给Binding。前面还提到过XmlDataProvider,这两个类的父类都是DataSourceProvider抽象类。
现在有一个名为Calculator的类,它具有加、减、乘、除的方法:
public class Caculate
{
public string Add(string arg1,string arg2)
{
double x = 0;
double y = 0;
double z = 0;
if(double.TryParse(arg1,out x)&&double.TryParse(arg2,out y))
{
z = x + y;
return z.ToString();
}
return "Iput Error";
}
//其它方法省略
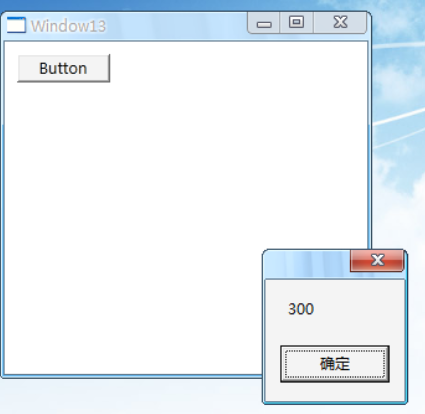
}我们先写一个非常简单的小例子来了解下ObjectDataProvider类。随便新建一个WPF窗体,窗体内拖放一个控件,控件的Click事件如下:
  private void button1_Click(object sender, RoutedEventArgs e)
        {
            ObjectDataProvider odp = new ObjectDataProvider();
            odp.ObjectInstance = new Caculate();
            odp.MethodName="Add";
            odp.MethodParameters.Add("100");
            odp.MethodParameters.Add("200");
            MessageBox.Show(odp.Data.ToString());

        }
运行程序,单击button我们会看到如下界面:
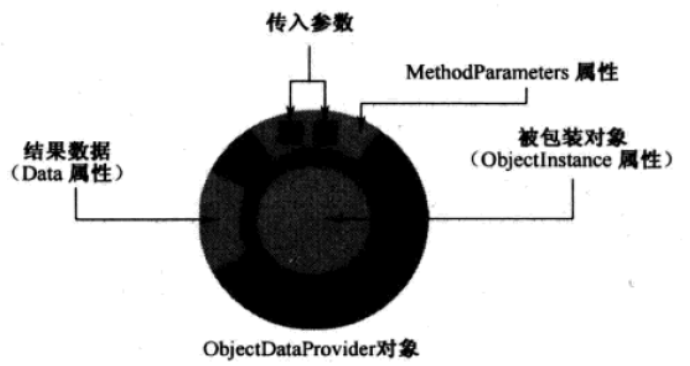
通过这个程序我们可以了解到ObjectDataProvider对象和它被包装的对象关系如下图:
了解了ObjectDataProvider的使用方法,我们看看如何把它当作Binding的Source来使用。程序的XAML代码和截图如下:
<Window x:Class="WpfApplication1.Window14"
        xmlns="http://schemas.microsoft.com/winfx/2006/xaml/presentation"
        xmlns:x="http://schemas.microsoft.com/winfx/2006/xaml"
        Title="Window14" Height="202" Width="345">
    <StackPanel Background="LightBlue">
        <TextBox Height="23" Name="textBox1" Width="200" HorizontalAlignment="Left" Margin="15"/>
        <TextBox Height="23" Name="textBox2" Width="200" HorizontalAlignment="Left" Margin="15"/>
        <TextBox Height="23" Name="textBox3" Width="200" HorizontalAlignment="Left" Margin="15"/>
    </StackPanel>
</Window>
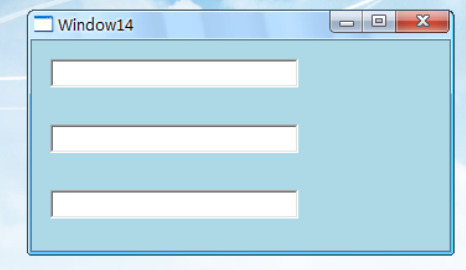
这个程序实现的功能是,我在前两个TextBox里面输入值的时候,第三个TextBox会显示前两个文本框里面相加之和。把代码写在一个名为SetBinding的方法里面,然后在窗体的构造器里面调用这个方法:
private void SetBinding()
        {
            ObjectDataProvider objpro = new ObjectDataProvider();
            objpro.ObjectInstance = new Caculate();
            objpro.MethodName = "Add";
            objpro.MethodParameters.Add("0");
            objpro.MethodParameters.Add("0");
            Binding bindingToArg1 = new Binding("MethodParameters[0]") { Source=objpro,BindsDirectlyToSource=true, UpdateSourceTrigger= UpdateSourceTrigger.PropertyChanged};
            Binding bindingToArg2 = new Binding("MethodParameters[1]") { Source=objpro,BindsDirectlyToSource=true,UpdateSourceTrigger=UpdateSourceTrigger.PropertyChanged};
            Binding bindToResult = new Binding(".") { Source=objpro};
            this.textBox1.SetBinding(TextBox.TextProperty, bindingToArg1);
            this.textBox2.SetBinding(TextBox.TextProperty, bindingToArg2);
            this.textBox3.SetBinding(TextBox.TextProperty,bindToResult);
        }
让我们先来分析一下上面两段代码,前面说过,ObjectDataProvider类的作用是包装一个以方法暴露数据的对象,这里我们先创建了一个ObjectDataProvider的对象,然后用一个Caculate对象为其ObjectInstance对象赋值---这就把一个Caculate对象包装在了ObjectDataProvider里面。还有另外一个办法来创建被包装的对象,那就是告诉包装对象被包装对象的类型和希望调用的构造器,让ObjectDataProvider自己来创建对象,代码大概是这样:
//---
            objpro.ObjectInstance = typeof(Caculate);
            objpro.ConstructorParameters.Add(arg1);
            objpro.ConstructorParameters.Add(arg2);
            //----
因为在XAML中创建对象比较麻烦,可读性差,所以我们一般会在XAML代码中使用这种指定类型和构造器的办法。
接着,我们使用MethodName属性指定要调用的Caculator对象中名为Add的方法---问题又来了,如果Caculator有多个构造器参数的方法Add应该如何区分?我们知道,重载方法的区别在于参数列表,紧接着两句就是向MethodParameter属性里面加入两个string类型的参数,这就相当于告诉ObjectDataProvider对象去调用Caculator对象中具有两个string类型参数的Add方法,换句话说,MethodParameter对于参数的感应是非常敏感的。
准备好数据源之后,我们准备创建Binding。前面我们已经讲过使用索引器作为Binding的Path,第一个Binding它的Source是一个ObjectDataProvider对象,Path是ObjectDataProvider中MethodParameters所引用的第一个元素。BindsDirectlyToSource这句话是告诉Binding只是将UI上的值传递给源而不是被ObjectDataProvider包装的Caculator,同时UpdateSourceTrigger设置为UI只要一有变化就更新Source。第二个Binding只是对第一个的翻版,只是把Path属性指向了第二个元素。第三个binding仍然使用ObjectDataProvider作为Source,但使用“.”作为Path----前面讲过,当数据源本身就是数据的时候就用“.”来做为Path,在XAML中"."可以不写。
注意:
在ObjectDataProvider对象作为Binding的Source的时候,这个对象本身就代表了数据,所以这里的Path使用的“.”,而不是Data属性。
最后几行就是将Binding对象关联到3个TextBox对象上。程序运行效果如下:
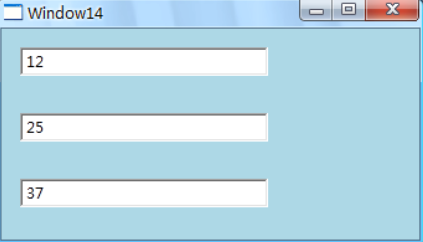
一般情况下数据从那里来,哪里就是Binding的Source,数据到哪里去,哪里就是Binding 的Target。按这个理论,前两个TextBox应该是ObjcetDataProvider的源,而ObjcetDataProvider对象又是最后一个TextBox的源。但实际上,三个TextBox都以ObjcetDataProvider作为数据源,只是前两个在数据流向上做了限制,这样做的原因不外乎有两个:
1、ObjcetDataProvider的MethodParameter不是依赖属性,不能作为Binding的目标。
2、数据驱动UI理念要求我们尽可能的使用数据对象作为Binding的Source而把UI当做Binding的Target。
1.3.12 使用Binding的RelativeSource
当一个Binding有明确的来源的时候,我们可以通过Source或者ElementName赋值的办法让Binding与之关联。有些时候我们不能确定作为Source对象叫什么名字,但是我们知道它与做为Binding目标对象在UI上的相对关系,比如控件自己关联自己的某个数据,关联自己某级容器的数据,这时候就需要用到Binding的RelativeSource属性。
RelativeSource属性的类型是RelativeSource类,通过这个类的几个静态或者非静态的属性我们可以控制它搜索相对数据源的方式。请看下面这段代码:
<Window x:Class="WpfApplication1.Window15"
        xmlns="http://schemas.microsoft.com/winfx/2006/xaml/presentation"
        xmlns:x="http://schemas.microsoft.com/winfx/2006/xaml"
        Title="Window15" Height="375" Width="516">
    <Grid Background="Red" Margin="10" x:Name="gd1">
        <DockPanel x:Name="dp1" Margin="10" Background="Orange">
            <Grid Background="Yellow" Margin="10" x:Name="gd2">
                <DockPanel Name="dp2" Margin="10" Background="LawnGreen">
                    <TextBox  Name="textBox1"  Margin="10" FontSize="24"/>
                </DockPanel>
            </Grid>
        </DockPanel>
    </Grid>
</Window>
界面运行结果如下:
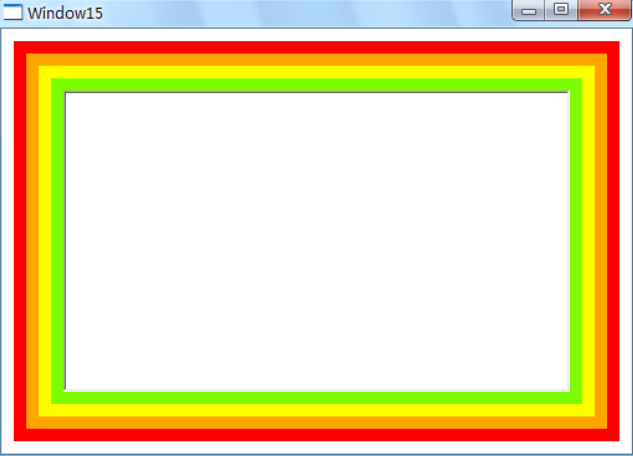
我们把TextBox的Text属性关联到外层容器的Name属性上。在窗体的构造器里面添加如下几行代码:
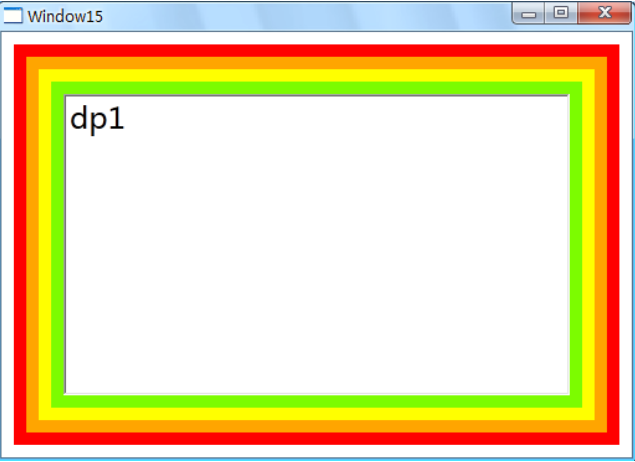
RelativeSource rs = new RelativeSource(RelativeSourceMode.FindAncestor);
            rs.AncestorLevel = 1;
            rs.AncestorType = typeof(Grid);
            Binding bind = new Binding("Name") { RelativeSource = rs };
            this.textBox1.SetBinding(TextBox.TextProperty, bind);
或在XAML代码中插入等效代码:
<TextBox Name="textBox1" Margin="10" FontSize="24" Text="{Binding Path=Name, RelativeSource={RelativeSource Mode=FindAncestor,AncestorType={x:Type Grid},AncestorLevel=1}}"/>AncestorLevel属性指定的是以Binding目标控件为起点的层级偏移量---gd2的偏移量是1,gd2的偏移量是2,依次类推。AncestorType属性告诉Binding去找什么类型的对象作为自己的源,不是这个类型的对象会被跳过。上面这段代码的意思是告诉Binding从自己的第一层依次向外找,找到第一个Grid类型对象后把它当作自己的源。运行效果如下图:
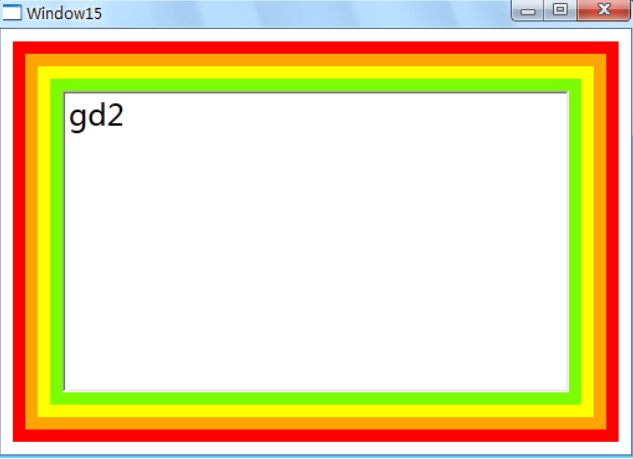
如果把代码改成如下这样:
RelativeSource rs = new RelativeSource(RelativeSourceMode.FindAncestor);
            rs.AncestorLevel = 2;
            rs.AncestorType = typeof(DockPanel);
            Binding bind = new Binding("Name") { RelativeSource = rs };
            this.textBox1.SetBinding(TextBox.TextProperty, bind);
或者把XAML代码改成如下:
Text="{Binding Path=Name, RelativeSource={RelativeSource Mode=FindAncestor,AncestorType={x:Type DockPanel},AncestorLevel=2}}"运行效果如下:
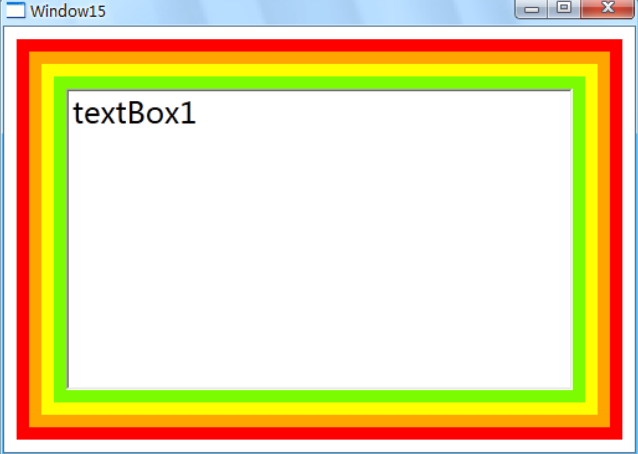
如果TextBox需要关联自身的Name属性,那么代码应该这样写:
RelativeSource rs = new RelativeSource(RelativeSourceMode.Self);

            Binding bind = new Binding("Name") { RelativeSource = rs };
            this.textBox1.SetBinding(TextBox.TextProperty, bind);
对应的XAML代码如下:
Text="{Binding Path=Name, RelativeSource={RelativeSource Mode=Self}}"运行效果如下图:
RelativeSource类的Mode属性是RelativeSourceMode枚举,它的值有:PriviousData、TemplatedParent、Self和FindAncestor。RelativeSource还有3个静态属性:PriviousData、Self、TemplatedParent,它们的类型是RelativeSource类。实际上这3个静态属性就是创建一个RelativeSource的实例、把实例的Mode设置为相对应的值,然后返回这个实例。之所以准备这3个静态属性是为了在XAML代码里面直接获取RelativeSource实例。
在DataTemplate中经常用到这这3个静态属性,学习DataTemplate的时候请留意它们的使用方法。
1.4 binding对数据的转换和校验
前面我们已经知道Binding的作用就是架在Source和Target之间的桥梁,数据可以在这座桥梁的帮助下来流通。就像现实社会中桥梁需要设置安检和关卡一样,Binding这座桥上也可以设置关卡对数据进行验证,不仅如此,如果Binding两端需要不同的数据类型的时候我们还可以为数据设置转换器。
Binding用于数据有效性校验的关卡是他的ValidationRules属性,用于数据类型转换的关卡是它的Convert属性。
1.4.1 Binding的数据校验
Binding的ValidationRules属性是Collection<ValidationRule>,从它的名称和数据类型我们可以得知可以为每个Binding设置多个数据校验条件,每一个条件是一个ValidationRule对象。ValidationRule是一个抽象类,在使用的时候我们需要创建它的派生类并实现它的Validate方法的返回值是ValidateionResult类型对象,如果通过验证,就把ValidateionResult对象的IsValidate属性设为true,反之,则需要将IsValidate设置为false并为其ErrorContent属性设置一个合适的消息内容(一般是字符串)。
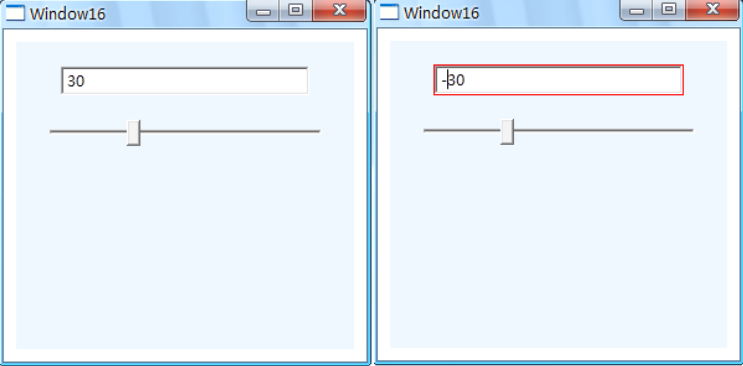
下面这个程序的UI绘制一个TextBox和一个Slider,然后在后台C#代码中建立Binding把它们关联起来---- 已Slide为源,TextBox为目标。Slider的取值范围是0~100,也就是说我们需要验证TextBox中输入的值是不是在0~100之间。
<Window x:Class="WpfApplication1.Window16"
        xmlns="http://schemas.microsoft.com/winfx/2006/xaml/presentation"
        xmlns:x="http://schemas.microsoft.com/winfx/2006/xaml"
        Title="Window16" Height="300" Width="300">
    <StackPanel Background="AliceBlue" Margin="10">
        <TextBox Height="23" Name="textBox1" Width="200" Margin="20"/>
        <Slider Height="23" Name="slider1" Width="219" Maximum="100" />
    </StackPanel>
</Window>
为了进行校验,我们准备一个ValidationRule的派生类,内容如下:
 public class RangeValidationRule : ValidationRule
    {

        public override ValidationResult Validate(object value, System.Globalization.CultureInfo cultureInfo)
        {
            double d = 0;
            if(double.TryParse(value.ToString(),out d))
            {
                if(d>=0&&d<=100)
                {
                    return new ValidationResult(true,null);
                }
            }
            return new ValidationResult(false,"ErrorContent");
        }
    }
然后在窗体里面建立Binding:
public Window16()
        {
            InitializeComponent();
            Binding bind =new Binding("Value") { UpdateSourceTrigger= UpdateSourceTrigger.PropertyChanged,Source=slider1, Mode= BindingMode.TwoWay};
            ValidationRule rule = new RangeValidationRule();
            rule.ValidatesOnTargetUpdated = true;
            bind.ValidationRules.Add(rule);

            this.textBox1.SetBinding(TextBox.TextProperty, bind);
        }
完成后运行程序,当输入0~100之间的值的时候程序正常显示,但是输入区间之外的值的时候TextBox会显示为红色边框,表示值是错误的,不能传值给Source。效果如下图:
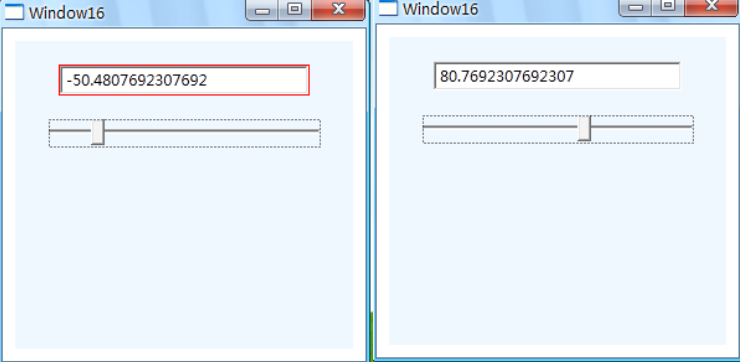
先把Silider的取值范围从0~100改为-100~200:
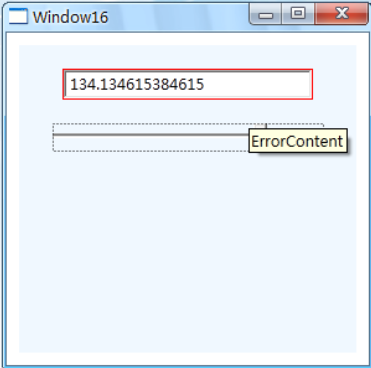
你也许回想,在验证错误的时候,ValidationResult会携带一条错误信息,那么如何使用这条错误信息呢?想要用到这一点,需要用到后面会详细讲解到的知识-----路由事件(Routed Event)。
首先在创建Binding 的时候要把Binding的对象的NotifyOnValidationError属性设置为true,这样,当数据校验失败的时候Binding就像报警器一样发出一个信号。这个信号会在已Binding对象的Target为起点的UI树上进行传播。信号没到达一个节点,如果这个节点设置了对这种信号的侦听器(事件处理器),那么这个侦听器就会被触发并处理这个信号,信号处理完毕后,还可以是否让信号继续沿着UI树向上传播---这就是路由事件。信号在UI树上传递的过程称为路由(Route)。
建立Binding的代码如下:
public Window16()
        {
            InitializeComponent();
            Binding bind =new Binding("Value") { UpdateSourceTrigger= UpdateSourceTrigger.PropertyChanged,Source=slider1, Mode= BindingMode.TwoWay};
            ValidationRule rule = new RangeValidationRule();
            rule.ValidatesOnTargetUpdated = true;
            bind.ValidationRules.Add(rule);
            bind.NotifyOnValidationError = true;
            this.textBox1.SetBinding(TextBox.TextProperty, bind);
            this.textBox1.AddHandler(Validation.ErrorEvent, new RoutedEventHandler(ValidationError));
        }
用于侦听校验错误事件的事件处理器如下:
private void ValidationError(object sender, RoutedEventArgs e)
        {
            if (Validation.GetErrors(textBox1).Count > 0)
            {
                this.textBox1.ToolTip = Validation.GetErrors(textBox1)[0].ErrorContent.ToString();
            }
            else
            {
                this.textBox1.ToolTip = "";
            }
        }
程序如果校验失败,就会使用ToolTip提示用户,如下图:
1.4.2 Binding的数据转换
前面的很多例子我们都在使用Binding将TextBox和Slider之间建立关联----Slider控件作为Source(Path的Value属性),TextBox作为Target(目标属性为Text)。不知道大家有没有注意到,Slider的Value属性是Double类型值,而TextBox的Text属性是string类型的值,在C#这种强类型语言中却可以来往自如,是怎么回事呢?
原来Binding还有另外一种机制称为数据转换,当Source端指定的Path属性值和Target端指定的目标属性不一致的时候,我们可以添加数据转换器(DataConvert)。上面我们提到的问题实际上就是double和stirng类型相互转换的问题,因为处理起来比较简单,所以WPF类库就自己帮我们做了,但有些数据类型转换就不是WPF能帮我们做的了,例如下面的这种情况:
Source里面的值是Y、N、X三个值(可能是Char类型,string类型或者自定义枚举类型),UI上对应的是CheckBox控件,需要把这三个值映射为它的IsChecked属性值(bool类型)。
当TextBox里面必须输入的有类容时候用于登录的Button才会出现,这是string类型与Visibility枚举类型或bool类型之间的转换(Binding的Model将是oneway)。
Source里面的值有可能是Male或FeMale(string或枚举),UI是用于显示图片的Image控件,这时候需要把Source里面值转换为对应的头像图片URI(亦是oneway)。
当遇到这些情况,我们只能自己动手写Converter,方法是创建一个类并让这个类实现IValueConverter接口,IValueConverter定义如下:
public interface IValueConverter
    {
        object Convert(object value, Type targetType, object parameters, CultureInfo culture);
        object ConvertBack(object value, Type targetType, object parameters, CultureInfo culture);
    }
当数据从Binding的Source流向Target的时候,Convert方法将被调用;反之ConvertBack将被调用。这两个方法的参数列表一模一样:第一个参数为Object。最大限度的保证了Convert的重要性。第二个参数用于确定返回参数的返回类型。第三个参数为了将额外的参数传入方法,若需要传递多个信息,则需要将信息做为一个集合传入即可。
Binding对象的Mode属性将影响这两个方法的调用;如果Mode为TwoWay或Default行为与TwoWay一致则两个方法都有可能被调用。如果Mode是OneWay或者Default行为与OneWay一致则只有Convert方法会被调用。其它情况同理。
下面这个例子是一个Converter的综合实例,程序的用途是向玩家显示一些军用飞机的状态信息。
首先创建几个自定义数据类型:
public enum Category
    {
        Bomber,
        Fighter
    }

    public enum State
    {
        Available,
        Locked,
        Unknown
    }

    public class Plane
    {
        public Category category { get; set; }
        public State state { get; set; }
        public string name { get; set; }
    }
在UI里,Category的状态被映射为图标,这两个图标已经被我放入项目中,如图:
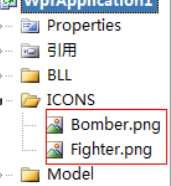
同时飞机的State属性在UI里面被映射为CheckBox。因为存在以上两种映射关系。我们需要提供两个Converter:一个有Categroy类型单向转换为string类型(XAML会把string解析为图片资源),另一个是State和bool类型直接的双向转换。代码如下:
public class CategoryToSourceConverter:IValueConverter
    {

        public object Convert(object value, Type targetType, object parameters, System.Globalization.CultureInfo culture)
        {
            Category category = (Category)value;
            switch (category)
            {
                case Category.Bomber:
                    return @"ICONS/Bomber.png";

                case Category.Fighter:
                    return @"ICONS/Fighter.png";

                default:
                    return null;

            }
        }

        public object ConvertBack(object value, Type targetType, object parameters, System.Globalization.CultureInfo culture)
        {
            throw new NotImplementedException();
        }
    }
public class StateToNullableBoolConverter:IValueConverter
{
public object Convert(object value, Type targetType, object parameters, System.Globalization.CultureInfo culture)
{
State state = (State)value;
switch (state)
{
case State.Available:
return true;
case State.Locked:
return false;
case State.Unknown:
default:
return null;
}
}
public object ConvertBack(object value, Type targetType, object parameters, System.Globalization.CultureInfo culture)
{
bool? nb = (bool?)value;
switch (nb)
{
case true:
return State.Available;
case false:
return State.Locked;
case null:
default:
return State.Unknown;
}
}
}下面我们来看看如何在XAML代码里面来消费这些Converter:
<Window x:Class="WpfApplication1.Window17"
        xmlns="http://schemas.microsoft.com/winfx/2006/xaml/presentation"
        xmlns:x="http://schemas.microsoft.com/winfx/2006/xaml"
        xmlns:local="clr-namespace:WpfApplication1.BLL"
        Title="Window17" Height="327" Width="460">
    <Window.Resources>
        <local:CategoryToSourceConverter x:Key="cts" />
        <local:StateToNullableBoolConverter x:Key="snb" />
    </Window.Resources>
    <StackPanel Name="stackPanel1" Background="AliceBlue" Margin="10">
        <ListBox  Name="listBox1" Height="160" Margin="5">
            <ListBox.ItemTemplate>
                <DataTemplate>
                    <StackPanel Orientation="Horizontal">
                        <Image Height="16" Name="image1" Stretch="Fill" Width="16" Source="{Binding Path=category,Converter={StaticResource cts}}"/>
                        <TextBlock Height="23" Name="textBlock1" Text="{Binding name}" Margin="8,0" Width="80"/>
                        <CheckBox  Height="16" Name="checkBox1" IsChecked="{Binding Path=state,Converter={StaticResource snb}}" IsThreeState="True"/>
                    </StackPanel>
                </DataTemplate>
            </ListBox.ItemTemplate>
        </ListBox>
        <Button Content="Load" Height="23" Name="button1" Width="131" Margin="5" Click="button1_Click" />
        <Button Content="Save" Height="23" Name="button2" Width="131" Margin="5" Click="button2_Click" />
    </StackPanel>
</Window>
Load按钮的事件处理器负责把一组飞机的数据赋值给ListBox的ItemSource属性,Save的Click事件负责把用户修改过的数据写入文件:
/// <summary>
/// Load按钮事件处理器
/// </summary>
/// <param name="sender"></param>
/// <param name="e"></param>
private void button1_Click(object sender, RoutedEventArgs e)
{
List<Plane> infos = new List<Plane>() {
new Plane(){ category= Category.Bomber,name="B-1", state= State.Unknown},
new Plane(){ category= Category.Bomber,name="B-2", state= State.Unknown},
new Plane(){ category= Category.Fighter,name="F-22", state= State.Locked},
new Plane(){ category= Category.Fighter,name="Su-47", state= State.Unknown},
new Plane(){ category= Category.Bomber,name="B-52", state= State.Available},
new Plane(){ category= Category.Fighter,name="J-10", state= State.Unknown},
};
this.listBox1.ItemsSource = infos;
}
/// <summary>
/// Save按钮事件处理器
/// </summary>
/// <param name="sender"></param>
/// <param name="e"></param>
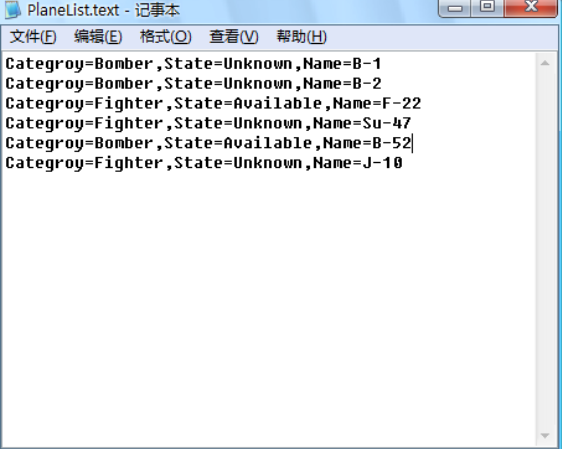
private void button2_Click(object sender, RoutedEventArgs e)
{
StringBuilder sb = new StringBuilder();
foreach (Plane item in listBox1.Items)
{
sb.AppendLine(string.Format("Categroy={0},State={1},Name={2}",item.category,item.state,item.name));
}
File.WriteAllText(@"D:\PlaneList.text",sb.ToString());
}运行程序,单击CheckBox修改飞机的State,如图:
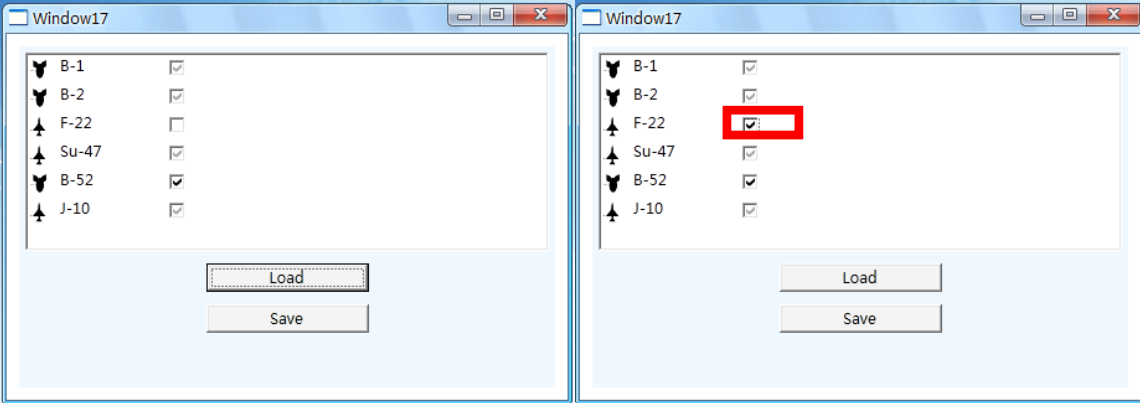
单击Save后打开D:\\PlaneList.text数据如下图:
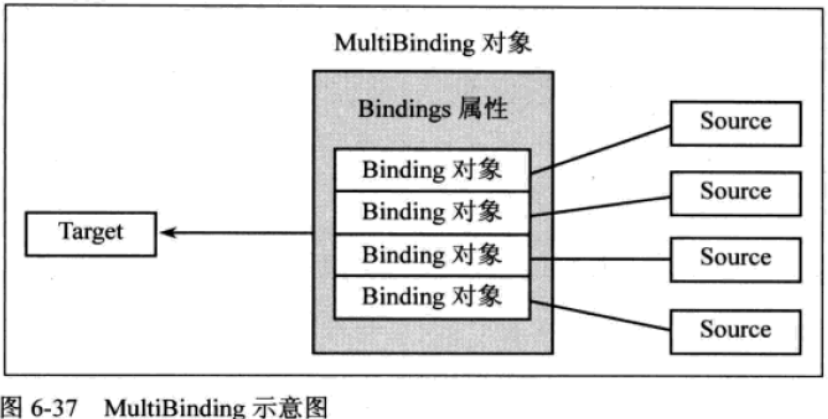
1.5 MultiBinding(多路Binding)
有时候UI需要显示的数据来源不止一个数据来源决定,这个时候就需要用到MultiBinding,即多路绑定。MultiBinding与Binding一样均以BindingBase为基类,也就是说,凡是能用Binding的场合都能使用MultiBinding。MutiBinding具有一个Bindings的属性,其类型是Connection<BindingBase>,通过这个属性,MultiBinding把一组Binding对象聚合起来,处在这个Binding结合中的对象可以拥有自己的数据校验和转换机制。它们汇集起来的数据将共同决定传往MultiBinding目标的数据。如下图:
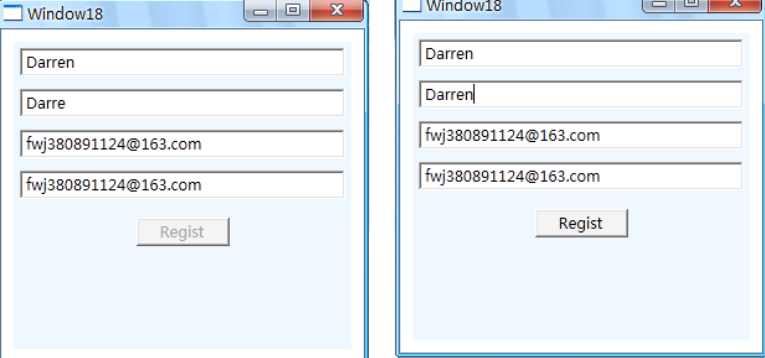
考虑这样一个需求,有一个用于新用户注册的UI(4个TextBox和一个Button),还有如下一些限定:
第一,二个TextBox用于输入用户名,要求数据必须一致。
第三,四个TextBox用于显示输入的邮箱,要求数据必须一致。
当TextBox的内容全部符合要求的时候,Button可用。
此UI的XAML代码如下:
<Window x:Class="WpfApplication1.Window18"
        xmlns="http://schemas.microsoft.com/winfx/2006/xaml/presentation"
        xmlns:x="http://schemas.microsoft.com/winfx/2006/xaml"
        Title="Window18" Height="300" Width="300">
    <StackPanel Name="stackPanel1"  Margin="10" Background="AliceBlue">
        <TextBox Height="23" Name="textBox1" Margin="5" />
        <TextBox Height="23" Name="textBox2" Margin="5" />
        <TextBox Height="23" Name="textBox3" Margin="5" />
        <TextBox Height="23" Name="textBox4" Margin="5" />
        <Button Content="Regist" Height="23" Name="btnSubmit" Width="75"  Margin="10"/>
    </StackPanel>
</Window>
后台代码如下:
public Window18()
        {
            InitializeComponent();
            SetBinding();
        }

        private void SetBinding()
        {
            //准备基础Binding
            Binding bind1 = new Binding("Text") { Source=textBox1};
            Binding bind2 = new Binding("Text") { Source = textBox2 };
            Binding bind3 = new Binding("Text") { Source = textBox3 };
            Binding bind4 = new Binding("Text") { Source = textBox4 };

            //准备MultiBinding
            MultiBinding mb = new MultiBinding() { Mode= BindingMode.OneWay};
            mb.Bindings.Add(bind1);//注意,MultiBinding对子元素的顺序是很敏感的。
            mb.Bindings.Add(bind2);
            mb.Bindings.Add(bind3);
            mb.Bindings.Add(bind4);
            mb.Converter = new MultiBindingConverter();
            ///将Binding和MultyBinding关联
            this.btnSubmit.SetBinding(Button.IsVisibleProperty, mb);
        }
注意:
MultiBinding对子元素的顺序非常敏感,因为这个数据决定了汇集到Convert里数据的顺序。
MultiBinding的Converter实现的是IMultiValueConverter。
本例的Converter代码如下:
using System;
using System.Collections.Generic;
using System.Linq;
using System.Text;
using System.Windows.Data;

namespace WpfApplication1.BLL
{
    public class MultiBindingConverter:IMultiValueConverter
    {
        public object Convert(object[] values, Type targetType, object parameter, System.Globalization.CultureInfo culture)
        {
            if(!values.Cast<string>().Any(text=>string.IsNullOrEmpty(text))&&values[0].ToString()==values[1].ToString()&&values[3].ToString()==values[4].ToString())
            {
                return true;
            }
            return false;
        }
        /// <summary>
        /// 该方法不会被调用
        /// </summary>
        /// <param name="value"></param>
        /// <param name="targetTypes"></param>
        /// <param name="parameter"></param>
        /// <param name="culture"></param>
        /// <returns></returns>
        public object[] ConvertBack(object value, Type[] targetTypes, object parameter, System.Globalization.CultureInfo culture)
        {
            throw new NotImplementedException();
        }
    }
}
程序运行效果如图:
小结:
WPF的核心理念是变传统的UI驱动数据变成数据驱动UI,支撑这个理念的基础就是本章讲的Data Binding和与之相关的数据校验和数据转换。在使用Binding的时候,最重要的就是设置它的源和路径。
Data Binding到此讲解完毕。
————————————————
版权声明:本文为CSDN博主「星火燎猿」的原创文章,遵循 CC 4.0 BY-SA 版权协议,转载请附上原文出处链接及本声明。
原文链接:https://blog.csdn.net/fwj380891124/article/details/8107646


")
")
常用的6种方法")
 封装运动功能")
:入口函数,运算符,模块与包,py文件 ,基础数据类型,列表")


")


Qt Widgets Designer界面设计器和界面应用")
:if的bool判断, 变量的作用域范围, 格式字符串, 弹窗, 列表推导式, 一个点歌小程序")