 少有人走的路
前言:
==========================================================
分类器相对于深度学习来讲是一种古老传统的图片处理技术。halcon中常见的有四类分类器:
MLP(多层神经网络neural Nets)
SVM(支持向量机)
K-NN(K-最邻近)
GMM(高斯混合类型)
分类器的应用领域主要是下面这些:
image segmentation 图像分割
object recognition 对象识别
quality control 质量控制
novelty detection 缺陷检测
optical character recognition(OCR) 光学字符识别
勇哥第一次见到分类器的视觉项目是锂电池的极片缺陷检测,效果还不错。
这两年深度学习火起来后,发现深度学习完成上面所说的领域的应用更容易,效果也更好。
但深度学习对硬件要求太高,你把IPC加装个一百多W的显卡很多时候是不现实的。
如果你用cpu来跑,会发现速度乎快乎慢,cpu全部内核会100%被占用。
分类器相对于深度学习来讲不吃硬件,所以相对来讲算是轻量级的应用。
==========================================================
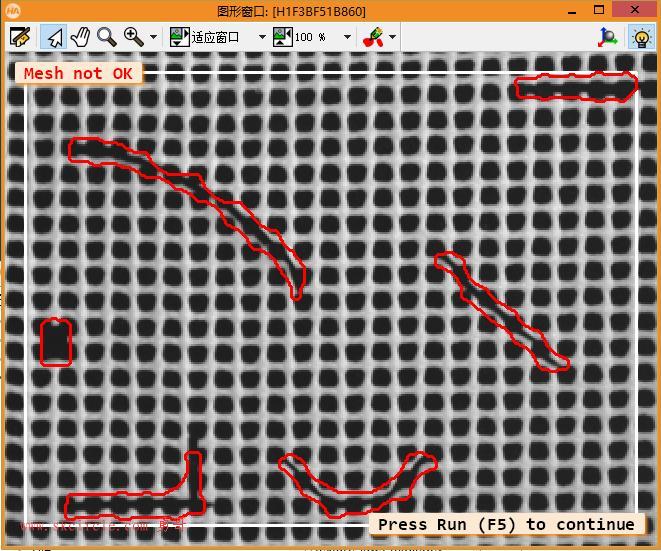
这个示例程序演示了如何使用MLP分类器进行新奇检测来执行网络纹理检查任务。
为了执行新奇检测,在内部训练拒绝类。
对于网络纹理检查任务,MLP随后可用于检测与训练好的对象的纹理不一样的纹理。
示例程序的效果。
dev_update_off ()
*
ReadPretrainedClassifier := false

* 取消对以下行的注释以从磁盘读取预训练分类器。
* 训练可能持续半分钟
* ReadPretrainedClassifier := true

SaveClassifier := false
* 取消对以下行的注释,以便在训练后将MLP分类器写入磁盘.
SaveClassifier := true
*

read_image (Image, 'plastic_mesh/plastic_mesh_01')
get_image_size (Image, Width, Height)
dev_close_window ()
dev_open_window (0, 0, Width, Height, 'black', WindowHandle)
dev_set_color ('red')
set_display_font (WindowHandle, 16, 'mono', 'true', 'false')
get_system ('example_dir', HalconExamples)

*用于分类的纹理过滤器将返回图像边界处的伪影,因为要检查的塑料网格的图像不包含整数个网格单元。
*因为这会导致错误地检测到图像边界的错误,
*在训练和分类时,必须将图像边界附近的区域排除在外。
*这是通过以下矩形完成的。
*请注意,该图像稍后将按两倍的比例缩小

gen_rectangle1 (Rectangle, 10, 10, Height / 2 - 11, Width / 2 - 11)
if (ReadPretrainedClassifier)
    * 从磁盘读取预训练分类器.
    dev_display (Image)
    disp_message (WindowHandle, 'Reading classifier from disk...', 'window', 10, 10, 'black', 'true')
    read_class_mlp (HalconExamples + '/hdevelop/Segmentation/Classification/novelty_detection.gmc', MLPHandle)
    wait_seconds (1.5)
else
    * 创建MLP分类器.
    create_class_mlp (5, 9, 2, 'softmax', 'principal_components', 3, 42, MLPHandle)
    * 训练是基于五张没有错误的图片.
    gen_empty_region (EmptyRegion)
    concat_obj (Rectangle, EmptyRegion, ObjectsConcat)
    for J := 1 to 5 by 1
        read_image (Image, 'plastic_mesh/plastic_mesh_' + J$'02')
        * 由于网格的分辨率非常高,图像被缩小。这节省了大量的处理时间
        zoom_image_factor (Image, ImageZoomed, 0.5, 0.5, 'constant')
        dev_display (ImageZoomed)
        disp_message (WindowHandle, 'Adding training samples...', 'window', 10, 10, 'black', 'true')
        * 生成纹理图像(是个自定义本地函数).
        gen_texture_image (ImageZoomed, ImageTexture)
        * 将样本添加到分类器.
        add_samples_image_class_mlp (ImageTexture, ObjectsConcat, MLPHandle)
    endfor
    dev_display (ImageZoomed)

    * 现在配置MLP,在训练期间添加拒绝类.
    set_rejection_params_class_mlp (MLPHandle, 'sampling_strategy', 'hyperbox_ring_around_each_class')
    set_rejection_params_class_mlp (MLPHandle, 'rejection_sample_factor', .3)

    * 训练MLP.
    disp_message (WindowHandle, 'Training MLP...', 'window', 10, 10, 'black', 'true')
    train_class_mlp (MLPHandle, 200, 1, 0.01, Error, ErrorLog)
    if (SaveClassifier)
        write_class_mlp (MLPHandle, HalconExamples + '/hdevelop/Segmentation/Classification/novelty_detection.gmc')
    endif
endif

* 现在检测塑料网格中的错误.
dev_set_draw ('margin')
dev_set_line_width (3)
for J := 1 to 14 by 1
    read_image (Image, 'plastic_mesh/plastic_mesh_' + J$'02')
    zoom_image_factor (Image, ImageZoomed, 0.5, 0.5, 'constant')
    dev_display (ImageZoomed)
    dev_set_color ('white')
    dev_display (Rectangle)
    gen_texture_image (ImageZoomed, ImageTexture)
    reduce_domain (ImageTexture, Rectangle, ImageTextureReduced)

    * 用MLP对训练类样本进行分类.
    classify_image_class_mlp (ImageTextureReduced, ClassRegions, MLPHandle, 0.5)

    * 对返回的原始错误进行后期处理,以删除检测到的错误中不重要的部分
    * Correct是分出来的ok类, Errors是错误类
    select_obj (ClassRegions, Correct, 1)
    select_obj (ClassRegions, Errors, 2)
    opening_circle (Errors, ErrorsOpening, 2.5)
    closing_circle (ErrorsOpening, ErrorsClosing, 12.5)
    connection (ErrorsClosing, ErrorsConnected)
    select_shape (ErrorsConnected, FinalErrors, 'area', 'and', 20, 1000000)

    count_obj (FinalErrors, NumErrors)
    dev_set_color ('red')
    dev_display (FinalErrors)
    if (NumErrors > 0)
        disp_message (WindowHandle, 'Mesh not OK', 'window', 10, 10, 'red', 'true')
    else
        disp_message (WindowHandle, 'Mesh OK', 'window', 10, 10, 'forest green', 'true')
    endif
    if (J < 14)
        disp_continue_message (WindowHandle, 'black', 'true')
    endif
    stop ()
endfor
gen_texture_image函数
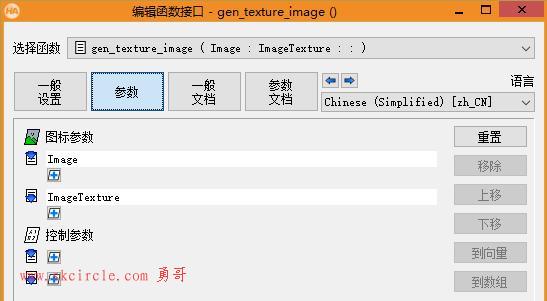
*纹理图像是一个五通道的图像,它包含了应用五种不同的滤波法则(基本上对应于一阶导数和二阶导数)
*并对它们进行充分平滑的结果。
texture_laws (Image, ImageEL, 'el', 5, 5)
texture_laws (Image, ImageLE, 'le', 5, 5)
texture_laws (Image, ImageES, 'es', 1, 5)
texture_laws (Image, ImageSE, 'se', 1, 5)
texture_laws (Image, ImageEE, 'ee', 2, 5)
compose5 (ImageEL, ImageLE, ImageES, ImageSE, ImageEE, ImageLaws)
smooth_image (ImageLaws, ImageTexture, 'gauss', 3)
return ()
在MLP, GMM, SVM中均有这个新奇检测的例子。
这个例子的关键在于gen_texture_image函数在训练MLP和分类时都对原图进行了5通道处理,处理的时候采用了texture_laws纹理滤波。
如果直接对源图做训练和分类,效果会很差。
---------------------
作者:hackpig
来源:www.skcircle.com
版权声明:本文为博主原创文章,转载请附上博文链接!


")
")
常用的6种方法")
 封装运动功能")


:随机对象源,用于生成随机摆放的物料")


Qt Widgets Designer界面设计器和界面应用")
:if的bool判断, 变量的作用域范围, 格式字符串, 弹窗, 列表推导式, 一个点歌小程序")