 少有人走的路
获取图像像素的指针
CV-Assert(myImage.depth()==CV_8U);
Mat.ptr < uchar>(int i=0)获取像素矩阵的指针,索引i表示第几行,从0开始计行数。
获得当前行指针const uchar * current = myImage.ptr< uchar>(row);
获取当前像素点P(row,col)的像素值p(row,col)=current[col]
像素范围处理saturate_cast< uchar >
- saturate_cast< uchar>(-100),返回0.
- saturate_cast< uchar>(-288),返回255
- saturate_cast< uchar>(100),返回100
- 这个函数的功能是确保RGB值的范围在0~255之间
矩阵的掩膜操作
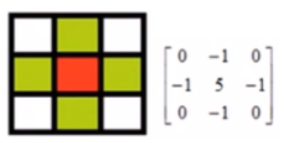
通过掩膜来提高图像对比度。

红色是中心像素,上下左右对每个像素做同样的处理操作,得到最终结果就是对比度提高之后的输出图像Mat对象。
函数调用filter2D
定义掩膜:Mat kernel = (Mat_< char>(3,3)<<0,-1,0,-1,5,-1,0,-1,0);
filter2D(src,dst,src.depth(),kernel); src.depth()表示位图深度,有32,24,8等。
时间测量
double t = getTickCount();
double timeconsume = (getTickCount() - t)/getTickFrequency() ;
源代码实例:
#include<iostream>
#include<opencv2/core/core.hpp>
#include<highgui/highgui.hpp>
#include <opencv2/imgproc/imgproc.hpp>
#include <math.h>

using namespace cv;
using namespace std;

int main()
{
    Mat src,dst;

    src = imread("lena.jpg");

    if(!src.data)
    {
        cout<<"could not load image...\n"<<endl;
        return -1;
    }

    namedWindow("input image",CV_WINDOW_AUTOSIZE);

    imshow("input image",src);

    //int cols = src.cols * src.channels();  //图像的行数乘以通道数
    //int offsetx = src.channels();
    //int rows = src.rows;
    //dst = Mat::zeros(src.size(),src.type());  //对图像进行初始化,类型和大小都一致,纯黑色的空白图像
    //for(int row = 1;row < rows -1;row ++)
    //{
    //  const uchar * current = src.ptr<uchar>(row);    //当前行
    //  const uchar * previous = src.ptr<uchar>(row);   //上一行
    //  const uchar * next = src.ptr<uchar>(row);      //下一行
    //  uchar * output = dst.ptr< uchar>(row);
    //  for (int col = offsetx;col<cols;col ++)
    //  {
    //      output[col] = saturate_cast<uchar>(5 * current[col] - (current[col-offsetx]+current[col+offsetx]+previous[col]+next[col]));
    //  }
    //}
    double t = getTickCount();
    Mat kernel = (Mat_<char>(3,3)<<0,-1,0,-1,5,-1,0,-1,0);  //定义一个掩膜
    filter2D(src,dst,src.depth(),kernel);                   //调用API

    double timeconsume = (getTickCount() - t)/getTickFrequency() ;
    cout<<"时间消耗为:"<<timeconsume<<endl;
    namedWindow("constrast image",CV_WINDOW_AUTOSIZE);
    imshow("constrast image",dst);


    waitKey(0);
    return 0;
}
源码和原图片请到Github下载:
https://github.com/MRwangmaomao/opencv-filter-test-Project.git
————————————————
版权声明:本文为CSDN博主「南山二毛」的原创文章,遵循 CC 4.0 BY-SA 版权协议,转载请附上原文出处链接及本声明。
原文链接:https://blog.csdn.net/qq_16481211/article/details/79556782


")
")
常用的6种方法")
 封装运动功能")


Qt Widgets Designer界面设计器和界面应用")
:if的bool判断, 变量的作用域范围, 格式字符串, 弹窗, 列表推导式, 一个点歌小程序")